Why you will love this recipe:
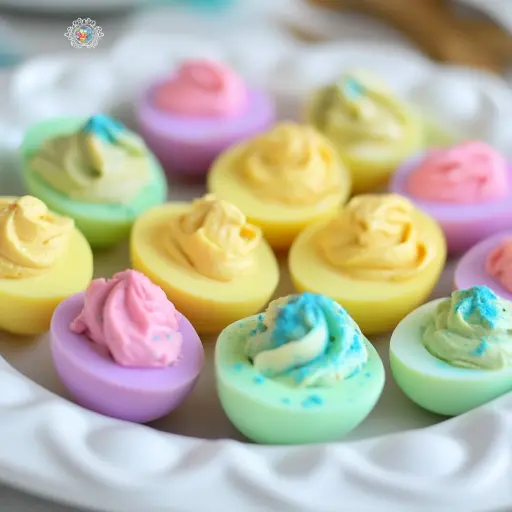
These Pastel Coloured Easter Deviled Eggs are a delightful twist on a classic appetizer, perfect for brightening up your Easter brunch or springtime gathering. What makes this recipe special is the combination of the familiar, creamy deviled egg filling with the visually stunning pastel shells. The naturally vibrant hues, achieved with simple food coloring, add a playful and festive touch, making them a crowd-pleasing centerpiece. These deviled eggs are more than just delicious; they are a conversation starter, a work of art, and a symbol of springtime joy, all in one bite.
Ingredients:
For the Deviled Egg Filling:
- 12 Large Eggs
- ½ cup Mayonnaise (Use a high-quality brand for the best flavour. Consider a homemade mayo for extra richness.)
- 2 teaspoons Pickle Juice (Adds a tangy zest to cut through the richness of the yolks.)
- 2 teaspoons Mustard (Yellow or Dijon both work well, depending on your preference.)
- 4 tablespoons Finely Chopped Dill Pickles (Adds texture and a burst of fresh, briny flavour. Sweet pickles can also be used for a sweeter twist.)
- Salt and Pepper, to taste (Freshly ground pepper is preferred for a bolder flavour.)
For the Egg Dye:
- 6 ounces Water in each cup (Use separate cups for each color.)
- 1 teaspoon White Vinegar, in each cup (The vinegar helps the dye adhere to the eggshells.)
- Food Coloring (Gel food coloring provides more intense and vibrant colors compared to liquid food coloring. Consider using a variety of pastel shades such as pink, blue, green, yellow, lavender, etc.)
Preparation:
step 1: Hard-Boiling the Eggs: Place the 12 eggs in a large saucepan. Ensure the eggs are in a single layer to promote even cooking. Cover them completely with cold water; the water level should be at least an inch above the eggs.
Step 2: Cooking the Eggs: Set the pan over medium-high heat. Watch carefully, and as soon as the water reaches a rolling boil, immediately turn off the heat. Cover the pan tightly with a lid. This is crucial for proper cooking.
Step 3: Resting Period: Allow the eggs to sit in the hot water, covered, for exactly 12 minutes. This precise timing ensures that the yolks are fully cooked but still creamy, not dry or rubbery. Set a timer to ensure accuracy.
Step 4: Cooling the Eggs: After 12 minutes, carefully drain the hot water from the pan. Immediately rinse the eggs under cold running water. Continue rinsing until the eggs are cool enough to handle. This rapid cooling stops the cooking process and makes the eggs easier to peel.
Step 5: Peeling the Eggs: Gently tap each egg all over its surface to create a network of fine cracks in the shell. Start peeling from the larger end of the egg, working your way around. Peeling under cold running water can help loosen the shell and make it easier to remove cleanly.
Instructions:
Deviled Egg Recipe:
- Cut the peeled eggs in half lengthwise using a sharp knife. Ensure the cut is clean and even for a professional look.
- Carefully scoop out the yolks from each egg half and place them in a medium-sized mixing bowl. Try to avoid tearing the egg whites to maintain their shape.
- Add the mayonnaise, pickle juice, and mustard to the bowl with the egg yolks.
- Using a fork or a potato masher, mash the yolks and stir all the ingredients together until the mixture is smooth and creamy. Ensure there are no lumps of yolk remaining.
- Stir in the finely minced dill pickles into the yolk mixture. The pickles add a delightful crunch and tang to the filling.
- Season the deviled egg filling with salt and pepper to taste. Start with a pinch of each, and then adjust according to your preference. Remember, the pickles already add some saltiness.
- Transfer the prepared deviled egg mixture into a large zip-top bag. This will serve as your DIY piping bag.
- Carefully snip off a small corner of the zip-top bag with scissors. The size of the opening will determine the thickness of the filling stream. A smaller opening provides more control.
- Pipe the deviled egg mixture back into the colored egg white halves. Fill each egg half generously, creating a slightly mounded effect.
How to Color Deviled Eggs:
- In separate cups or bowls, pour 6 ounces of water into each. Ensure you have enough cups for the number of different pastel colors you want to create.
- Add 1 teaspoon of white vinegar to each cup of water. The vinegar helps the food coloring adhere evenly to the eggshells.
- Add food coloring to each cup of water-vinegar mixture. Start with a few drops of each color and stir well. Add more food coloring gradually until you achieve your desired pastel shade. Remember, the color will appear lighter on the eggshells once dried.
- Gently place the boiled and peeled eggs into the colored water, ensuring they are fully submerged. Use a spoon to carefully lower the eggs into the dye to avoid cracking them.
- Let the eggs soak in the colored water for at least 10 minutes, or until you achieve the desired shade intensity. The longer they soak, the deeper the color will be. Check the eggs periodically to monitor the color development. For deeper colours, leave up to 30 minutes.
- While the eggs are soaking in the food coloring, prepare the deviled egg mixture using the yolks, as described in the recipe above. This allows you to efficiently use your time.
- Once the eggs have reached your desired color, gently remove them from the colored water using a spoon or a slotted spoon. Be careful not to scratch the dyed surface.
- Place the colored eggs on a stack of paper towels to dry. This will absorb any excess dye and prevent the color from smearing.
- Pat the eggs dry with additional paper towels. This will ensure a clean and even color distribution on the shells.
- Fill the coloured egg halves with the deviled egg mixture, and enjoy.
COOKING Rating:
Easy to Moderate. While the recipe is straightforward, achieving the perfect pastel colors and a smooth deviled egg filling requires some attention to detail.
Serving Suggestions:
- Arrange the Pastel Coloured Easter Deviled Eggs on a platter lined with fresh greens for an elegant presentation.
- Sprinkle a dash of paprika or finely chopped fresh herbs (such as chives or parsley) on top of each deviled egg for added flavour and visual appeal.
- Serve them as part of a larger Easter brunch spread, alongside other appetizers, main dishes, and desserts.
- These deviled eggs also make a great snack for picnics, potlucks, or springtime gatherings.
- Offer a variety of dips or sauces on the side, such as hot sauce, sriracha mayo, or a creamy horseradish sauce, for guests to customize their deviled eggs.
Tips:
- For the best results, use fresh, high-quality eggs.
- Don’t overcook the eggs, as this can result in dry, rubbery yolks and a green ring around the yolk.
- Experiment with different food coloring combinations to create unique pastel shades.
- If you don’t have a zip-top bag, you can use a piping bag with a decorative tip to fill the deviled eggs.
- Store leftover deviled eggs in an airtight container in the refrigerator for up to 2 days.
Prep Time: 20 minutes
Cook Time: 15 minutes
Total Time: 35 minutes (plus dyeing time)
Nutritional Information: (per serving, approximately 2 deviled egg halves)
Calories: 180
Protein: 7g
Sodium: 150mg
Conclusion:
Pastel Coloured Easter Deviled Eggs are a simple yet visually stunning way to elevate a classic dish for your Easter celebrations. The combination of the creamy, flavorful filling and the vibrant pastel shells makes them a guaranteed hit with both kids and adults. This recipe offers a delightful blend of taste and aesthetics, making it a perfect addition to your springtime menu. Enjoy the process of creating these beautiful and delicious treats, and savour the joy they bring to your table.
Questions and Answers:
Q1: Can I use liquid food coloring instead of gel food coloring?
A: Yes, you can use liquid food coloring. However, gel food coloring tends to be more concentrated, so you’ll need less to achieve the same vibrant color. If using liquid, start with a few drops and add more gradually until you reach the desired shade. Be mindful that too much liquid food coloring can slightly dilute the dye bath.
Q2: How long can I store the dyed eggs before making the deviled egg filling?
A: The dyed eggs can be stored in the refrigerator for up to 2-3 days before filling them. Make sure to keep them in an airtight container to prevent them from drying out.
Q3: Can I make the deviled egg filling ahead of time?
A: Yes, the deviled egg filling can be made a day in advance. Store it in an airtight container in the refrigerator. You may need to stir it gently before using to restore its creamy consistency.
Q4: Can I use something other than dill pickles in the filling?
A: Absolutely! Feel free to customize the filling to your liking. Sweet pickles, chopped capers, or even a touch of relish can be added for different flavor profiles. You can also experiment with different herbs like chives, parsley, or tarragon.
Q5: What if I don’t have white vinegar for the egg dye?
A: White vinegar helps the dye adhere to the eggshells, but if you don’t have it on hand, you can try using lemon juice as a substitute, though the results may not be as effective. It’s best to use vinegar to ensure the colors adhere properly.