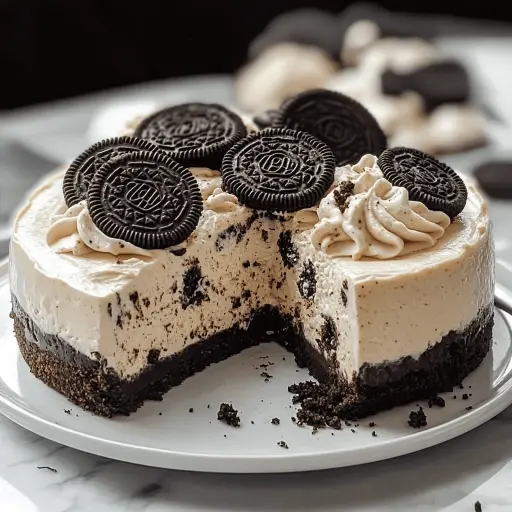
Description: Indulge in the creamy, dreamy delight of this No-Bake Oreo Cheesecake! This recipe offers a perfect blend of rich cream cheese filling, sweet white chocolate, and the unmistakable crunch of Oreo cookies, all nestled on a buttery Oreo crust. No oven required, making it an ideal dessert for any occasion, especially when you want to impress without the fuss. It’s a guaranteed crowd-pleaser, satisfying even the most discerning sweet tooth.
Ingredients:
- For the Crust:
- 25 Oreo cookies (approximately 300g, from a standard package)
- 1/4 cup (2 ounces or 56 grams) unsalted butter, melted
- For the Filling:
- 24 ounces (680 grams) full-fat cream cheese, softened to room temperature (usually 3 standard 8-ounce packages)
- 1 1/2 cups (180 grams) powdered sugar, sifted
- 1/2 cup (85 grams) white chocolate chips
- 1 1/4 cups (300 ml) heavy whipping cream, divided (1/4 cup for melting white chocolate, 1 cup for filling)
- 25 Oreo cookies (approximately 300g, from a standard package) – you’ll use 20 in the filling and 5 for optional garnish
Preparation:
Step 1: Prepare the Oreo Cookie Crust: Begin by separating the Oreo cookies. You’ll use 25 Oreos for the crust. Place them into a food processor. Pulse until the cookies are finely ground. Ensure there are no large chunks remaining for the crust to bind properly.
Step 2: Melt the Butter and Combine: Melt 1/4 cup (56g) of unsalted butter. You can do this in the microwave in 30-second intervals or in a saucepan over low heat. Be careful not to burn the butter. Pour the melted butter into the food processor with the crushed Oreos. Pulse again until the mixture is evenly moistened and resembles wet sand. The butter will help the Oreo crumbs bind together, creating a solid and flavorful base for your cheesecake.
Step 3: Press the Crust into the Pan: Prepare a 9-inch springform pan. Springform pans are essential for cheesecakes as they allow for easy removal without damaging the dessert. Pour the Oreo crumb mixture into the pan. Use the bottom of a measuring cup or your clean hands to firmly press the mixture evenly across the bottom and partially up the sides of the pan. Pressing firmly will ensure a sturdy crust that won’t crumble when slicing. Once pressed, set the crust aside in the refrigerator to chill while you prepare the filling. This chilling process helps the crust to firm up.
Step 4: Melt the White Chocolate: Place 1/2 cup (85g) of white chocolate chips in a microwave-safe bowl. Add 1/4 cup (60 ml) of the heavy whipping cream to the bowl. Microwave in 20-second intervals, stirring well after each interval, until the white chocolate is completely melted and smooth. Be careful not to overheat the white chocolate, as it can seize up and become grainy. Once melted, set aside to cool slightly.
Step 5: Beat the Cream Cheese: In a large mixing bowl, add the softened cream cheese. Use an electric mixer (either a stand mixer or a hand mixer) to beat the cream cheese until it is smooth and creamy. This usually takes about 2-3 minutes. Ensure there are no lumps, as the smoothness of the cream cheese will greatly affect the texture of the final cheesecake.
Step 6: Add Powdered Sugar and White Chocolate: Gradually add the sifted powdered sugar to the cream cheese, mixing on low speed until well combined. Sifting the powdered sugar ensures there are no clumps, resulting in a smoother filling. Once the powdered sugar is incorporated, pour in the slightly cooled melted white chocolate. Mix again until the white chocolate is evenly distributed throughout the cream cheese mixture.
Step 7: Whip the Remaining Cream: In a separate, clean mixing bowl, pour in the remaining 1 cup (240 ml) of heavy whipping cream. Use an electric mixer to whip the cream until stiff peaks form. This means the cream should hold its shape when the beaters are lifted. Be careful not to overwhip, as this can turn the cream into butter.
Step 8: Fold in the Whipped Cream: Gently fold the whipped cream into the cream cheese mixture in two or three additions. Folding is a delicate process where you use a spatula to gently incorporate the whipped cream without deflating it. This will ensure a light and airy texture in the cheesecake filling.
Step 9: Crush and Fold in the Oreos: Roughly crush the remaining 20 Oreo cookies. You can do this by placing them in a resealable bag and using a rolling pin or by roughly chopping them. Fold the crushed Oreos into the cream cheese mixture until evenly distributed.
Step 10: Assemble and Chill the Cheesecake: Pour the Oreo-infused cream cheese filling over the chilled Oreo crust in the springform pan. Spread the filling evenly. Cover the cheesecake with plastic wrap and refrigerate for at least 5-6 hours, or preferably overnight. This chilling time allows the cheesecake to set completely and develop its flavors.
Step 11: Garnish and Serve: Before serving, carefully remove the sides of the springform pan. If desired, garnish the cheesecake with additional Oreo cookies (halved or quartered) or a dusting of cocoa powder. Use a sharp knife dipped in hot water and wiped clean between slices to ensure neat cuts.
Why You Will Love This Recipe:
This No-Bake Oreo Cheesecake is the epitome of effortless elegance. Its appeal lies in the harmonious combination of textures and flavors – the buttery crunch of the Oreo crust, the smooth, decadent cream cheese filling infused with white chocolate, and the bursts of Oreo cookie pieces throughout. The fact that it requires no baking makes it a perfect choice for hot summer days or when you simply don’t want to deal with the complexities of baking. It’s easy to prepare, visually stunning, and, most importantly, incredibly delicious. It’s a guaranteed crowd-pleaser that will have everyone asking for the recipe. The flavors are nostalgic, familiar, yet elevated to a decadent dessert. It’s also easily customizable. You can add different extracts, swirls of caramel or chocolate sauce, or even fresh fruit to tailor it to your preferences. Finally, it is the ultimate make-ahead dessert, perfect for entertaining, as you can prepare it a day or two in advance, ensuring you have more time to spend with your guests.
Serving Suggestions:
- Serve chilled directly from the refrigerator.
- Garnish with additional Oreo cookies, either whole, halved, or crushed.
- Drizzle with chocolate syrup, caramel sauce, or raspberry sauce.
- Serve alongside fresh berries such as strawberries, raspberries, or blueberries.
- Top with a dollop of whipped cream or a scoop of vanilla ice cream.
- Pair with a cup of coffee, tea, or a glass of milk.
- For a more decadent presentation, dust with cocoa powder or a sprinkle of edible glitter.
Tips:
- Ensure your cream cheese is fully softened to room temperature to prevent lumps in the filling.
- Sift the powdered sugar to avoid clumps and ensure a smooth texture.
- Do not over-mix the filling after adding the whipped cream, as this can deflate the cream and result in a denser cheesecake.
- For the cleanest slices, dip a sharp knife in hot water and wipe clean between each cut.
- If you’re short on time, you can use a pre-made Oreo crust, but the homemade crust adds a superior flavor.
- For a more intense Oreo flavor, use double-stuffed Oreos.
- If you don’t have a springform pan, you can use a regular pie dish, but it will be more difficult to remove the cheesecake.
- Store leftovers in the refrigerator for up to 3-4 days.
Prep Time: 30 minutes
Cook Time: 0 minutes (No-Bake)
Total Time: Minimum 5-6 hours chilling, ideally overnight
Nutritional Information: (Approximate, per serving, based on 12 servings)
- Calories: 550-650
- Protein: 6-8g
- Sodium: 300-400mg
Conclusion:
This No-Bake Oreo Cheesecake is a delightful dessert that combines convenience with irresistible flavor. Its creamy texture, rich white chocolate notes, and the iconic crunch of Oreo cookies make it a treat that’s hard to resist. Whether you’re a seasoned baker or a novice in the kitchen, this recipe is sure to impress. So go ahead, indulge in a slice of this Oreo Dream Cheesecake – your taste buds will thank you! It’s the perfect dessert for celebrations, gatherings, or simply when you need a sweet pick-me-up. It’s easy to customize, visually appealing, and utterly delicious – a true testament to the fact that sometimes, the simplest recipes are the most rewarding.
Questions and Answers About This Recipe:
Q1: Can I use a different type of cookie for the crust?
A: Absolutely! While the recipe calls for Oreo cookies, you can definitely experiment with other types of cookies for the crust. Chocolate graham crackers, vanilla wafers, or even shortbread cookies would work well. Just make sure to adjust the amount of butter accordingly, depending on the texture of the cookie you choose. If the cookies are already quite buttery, you may need to use less melted butter to achieve the right consistency.
Q2: What if I don’t have heavy whipping cream? Can I substitute it?
A: While heavy whipping cream is ideal for creating a light and fluffy filling, you can try using a substitute. If you’re looking for a lighter option, you could use half-and-half, but be aware that the filling may not be as thick or stable. Another option is to use a stabilized whipped cream, which is readily available in most grocery stores. You could also try using a combination of milk and gelatin to create a similar texture, but this will require a bit more experimentation to get the proportions right.
Q3: How do I prevent the crust from sticking to the bottom of the pan?
A: To ensure the crust doesn’t stick, you can line the bottom of the springform pan with a circle of parchment paper before pressing in the Oreo crumb mixture. Another option is to grease the bottom and sides of the pan with a thin layer of butter or cooking spray. You can also use a removable bottom pan to make it easier to serve. Chilling the crust thoroughly before adding the filling also helps it to set and prevent sticking.
Q4: Can I make this cheesecake ahead of time?
A: Yes, definitely! This No-Bake Oreo Cheesecake is a great make-ahead dessert. In fact, it’s often better to make it a day or two in advance to allow the flavors to meld together and the cheesecake to fully set. Just make sure to store it covered in the refrigerator to prevent it from drying out. You can also freeze the cheesecake for longer storage, but be aware that the texture may change slightly upon thawing.
Q5: Can I add other flavors to the cheesecake filling?
A: Absolutely! This recipe is a great base for customization. You can add a variety of extracts, such as vanilla, almond, or peppermint, to enhance the flavor of the filling. You can also swirl in caramel sauce, chocolate sauce, or fruit preserves for a pop of flavor and visual appeal. Some people also like to add chopped nuts, chocolate chips, or other candies to the filling for added texture and flavor. Feel free to get creative and experiment with different combinations to find your perfect flavor profile!