Description:
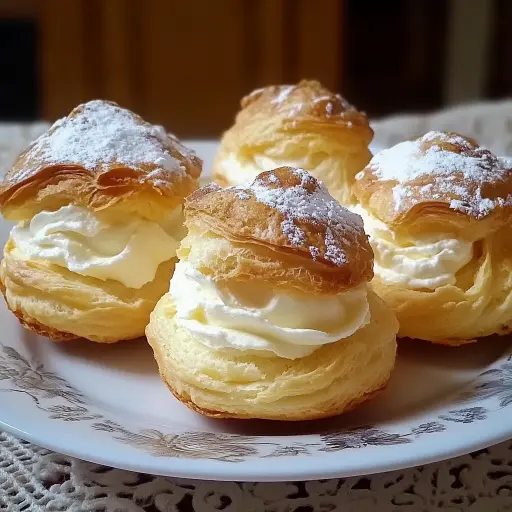
These light and airy cream puffs, filled with sweet, homemade whipped cream and dusted with powdered sugar, are a classic dessert that’s sure to bring back fond memories of Mom’s kitchen. The perfect combination of delicate pastry and rich, creamy filling makes them an irresistible treat for any occasion.
Ingredients:
For the Pastry:
- ½ cup (1 stick) unsalted butter
- 1 cup water
- 1 cup all-purpose flour
- 4 large eggs
For the Filling:
- 1 cup heavy cream
- 3 tablespoons powdered sugar
- 1 teaspoon vanilla extract
For Dusting:
- Additional powdered sugar
Preparation:
The secret to perfect cream puffs lies in the careful preparation of the pastry. Each step is crucial to achieving that light, airy texture that distinguishes a great cream puff from a mediocre one.
Step 1: Preheat the Oven
Before you begin, preheat your oven to 425°F (220°C). This initial high temperature is essential for creating the steam that causes the puffs to rise dramatically. Ensuring the oven is fully preheated before placing the puffs inside is vital for consistent results.
Step 2: Combine Water and Butter
In a medium saucepan, combine the water and butter. Place the saucepan over medium heat and bring the mixture to a rolling boil. Make sure the butter is completely melted before the water boils; this ensures an even consistency throughout the pastry.
Step 3: Add Flour and Form the Dough
Once the water and butter are boiling, remove the saucepan from the heat. Add all the flour at once to the mixture. Using a sturdy wooden spoon, stir vigorously and continuously until the mixture forms a smooth ball that pulls away from the sides of the pan. This step is critical; you’re essentially cooking the flour and starting the gelatinization process that gives the puffs their structure. This should take about 1 minute. The dough should appear smooth and slightly sticky, not crumbly or dry.
Step 4: Cool the Dough Slightly
After the dough has come together, remove the saucepan from the heat and let the mixture cool for about 5 minutes. This cooling period is important because adding the eggs to a very hot dough can cause them to cook prematurely, resulting in a pastry that doesn’t rise properly. The dough should still be warm to the touch but not steaming hot.
Step 5: Incorporate the Eggs
Beat in the eggs one at a time, using either a wooden spoon or an electric mixer. It’s important to fully incorporate each egg before adding the next. The dough will initially appear to break apart and look curdled, but as you continue to mix, it will eventually become smooth and glossy. This process can take some time and effort, but it’s essential for achieving the right consistency. The final dough should be thick, smooth, and glossy, with a texture that’s somewhat elastic.
Step 6: Shape the Puffs
Drop the dough by tablespoonfuls onto an ungreased baking sheet, forming about 12 mounds. Make sure to space them apart as they will expand significantly during baking. You can use a piping bag for a more uniform shape, but a simple tablespoon works just as well. For a smoother appearance, you can lightly dampen your fingers and gently smooth out any peaks or unevenness in the dough.
Baking the Pastry:
Step 7: Bake the Puffs
Place the baking sheet in the preheated oven and bake for 20-25 minutes, or until the puffs are golden brown and puffed. The high initial temperature helps the puffs rise rapidly, while gradually reducing the heat allows them to dry out and become stable. Do NOT open the oven door during the first 15 minutes of baking, as this can cause the puffs to collapse. Keep a close eye on them; they should be light and dry inside.
Step 8: Cool the Puffs
Remove the puffs from the oven and transfer them to a wire rack to cool completely. Immediately prick each puff with a knife to release steam and prevent them from getting soggy. This step is vital for maintaining their crispiness. Allow them to cool completely before filling.
Preparing the Filling:
Step 9: Whip the Cream
In a mixing bowl, whip the heavy cream using an electric mixer until it begins to thicken. Ensure the cream is very cold for the best results.
Step 10: Add Sugar and Vanilla
Add the powdered sugar and vanilla extract to the cream. Continue whipping until the cream forms stiff peaks. Be careful not to overwhip, as this can turn the cream into butter. The stiff peaks should hold their shape when the beaters are lifted from the bowl.
Assembling the Cream Puffs:
Step 11: Cut the Puffs
Once the pastry shells are cool, use a serrated knife to gently cut the tops off each puff. A serrated knife will help prevent tearing the delicate pastry.
Step 12: Fill the Puffs
Spoon or pipe the whipped cream into the bottoms of the pastry shells. Be generous with the filling for that luxurious taste. If you’re using a piping bag, fit it with a large round tip for easy filling.
Step 13: Replace the Tops
Replace the tops onto the filled shells.
Dusting and Serving:
Step 14: Dust with Powdered Sugar
Just before serving, dust the cream puffs with powdered sugar to give them a delightful sweet finish and a professional look. A fine-mesh sieve works well for dusting evenly.
Step 15: Serve Immediately
Serve immediately, or keep them refrigerated until ready to serve. Cream puffs are best enjoyed fresh, as the pastry can soften over time.
Why You Will Love This Recipe:
- Classic Comfort: Mom’s Famous Cream Puffs are a timeless dessert that evokes feelings of warmth and nostalgia. They’re perfect for sharing with loved ones or enjoying as a special treat.
- Impressive Yet Simple: Despite their elegant appearance, these cream puffs are surprisingly easy to make with just a few basic ingredients.
- Versatile: You can customize the filling to your liking. Try adding chocolate shavings, fruit purees, or flavored extracts to the whipped cream for a unique twist.
- Crowd-Pleasing: Cream puffs are always a hit at parties, potlucks, and family gatherings. Their delightful taste and texture are sure to impress your guests.
- Perfectly Balanced: The combination of the light, airy pastry and the rich, creamy filling is a match made in dessert heaven. The powdered sugar adds just the right amount of sweetness to complete the experience.
Serving Suggestions:
- Serve as a dessert for special occasions like birthdays, anniversaries, or holidays.
- Pair with a cup of coffee or tea for an afternoon treat.
- Arrange on a platter with fresh berries and a drizzle of chocolate sauce for an elegant presentation.
- Include in a dessert buffet alongside other pastries and sweets.
- Serve as a light and refreshing dessert after a heavy meal.
Tips:
- Use a Good Quality Butter: The flavor of the butter will significantly impact the taste of the pastry. Opt for a high-quality unsalted butter for the best results.
- Measure Ingredients Accurately: Precise measurements are crucial for achieving the right consistency in the pastry. Use measuring cups and spoons for accurate results.
- Don’t Open the Oven Door: Resist the temptation to open the oven door during baking, as this can cause the puffs to collapse.
- Cool Completely Before Filling: Make sure the pastry shells are completely cool before filling, or the whipped cream will melt.
- Make Ahead: The pastry shells can be made a day ahead and stored in an airtight container. Fill them just before serving to prevent them from getting soggy.
- Experiment with Fillings: Get creative with your fillings! Try adding Nutella, pastry cream, or even a savory filling like chicken salad for a unique twist.
Prep Time: 20 minutes Cook Time: 25 minutes Total Time: 45 minutes
Nutritional Information: (Approximate values per cream puff)
- Calories: 220
- Protein: 3g
- Sodium: 70mg
Conclusion:
Mom’s Famous Cream Puffs are more than just a dessert; they’re a celebration of simple pleasures and cherished family memories. This recipe is a testament to the fact that some of the most beloved dishes are also the easiest to make. So, gather your ingredients, put on your apron, and get ready to create a batch of these delightful treats that will bring joy to everyone who tastes them. Whether you’re a seasoned baker or a beginner, this recipe is sure to become a family favorite. Enjoy the process, savor the flavors, and create your own memories with each delicious cream puff.
Questions and Answers:
- Question: Can I make the cream puffs ahead of time? Answer: Absolutely! The pastry shells can be made a day or two ahead of time. Once they have cooled completely, store them in an airtight container at room temperature. You can then fill them with the whipped cream just before serving to prevent the pastry from becoming soggy. Preparing the shells in advance is a great way to break up the work and make the assembly process quick and easy.
- Question: Can I use margarine instead of butter? Answer: While you can technically use margarine, I strongly recommend using unsalted butter for the best flavor and texture. Butter has a richer, more complex flavor that elevates the taste of the pastry. Margarine, on the other hand, can sometimes have a slightly artificial taste and may not provide the same level of tenderness in the final product. If you’re looking for a dairy-free option, consider using a high-quality vegan butter alternative.
- Question: My cream puffs deflated after baking. What did I do wrong? Answer: There are several reasons why your cream puffs might have deflated. One common cause is opening the oven door too early during baking. This sudden change in temperature can cause the puffs to collapse. Also, make sure the pastry is fully baked and golden brown before removing it from the oven. Undercooked pastry is more likely to deflate. Finally, ensure that you prick the puffs with a knife as soon as they come out of the oven to release steam, which helps to prevent sogginess and deflation.
- Question: Can I freeze the cream puffs? Answer: You can freeze the un-filled pastry shells for up to a month. Allow them to cool completely, then store them in an airtight container or freezer bag. When you’re ready to use them, let them thaw at room temperature before filling. Freezing filled cream puffs is not recommended, as the whipped cream can become watery and the pastry can lose its crispness.
- Question: What other fillings can I use for these cream puffs? Answer: The possibilities are endless! While whipped cream is the classic choice, you can experiment with a variety of other fillings. Pastry cream, chocolate mousse, lemon curd, or even a savory filling like chicken salad or cream cheese with herbs would all be delicious. You can also add flavor extracts like almond, peppermint, or orange to the whipped cream for a unique twist. Consider using seasonal fruits like berries or peaches to create a beautiful and flavorful filling.