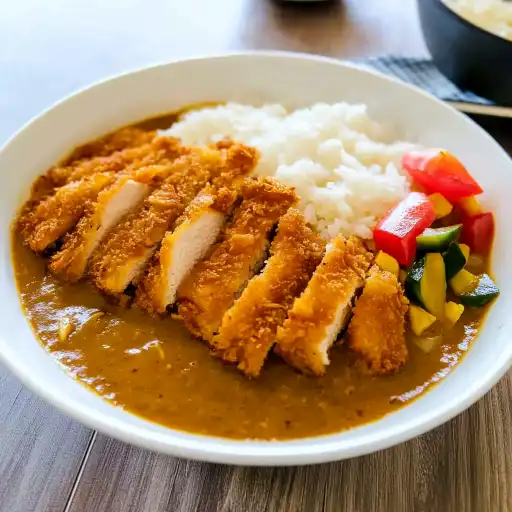
Description of this recipe: Katsu Curry is a soul-satisfying Japanese comfort food masterpiece. It features crispy, golden-brown chicken cutlets (katsu) nestled alongside a generous serving of rich, flavorful Japanese curry. Served over a bed of fluffy rice, it’s a dish that combines textures and flavors in a way that’s both comforting and exciting. This recipe guides you through each step, ensuring a restaurant-quality Katsu Curry in your own kitchen.
Why you will love this recipe:
- The Perfect Harmony of Textures: The crispy, crunchy chicken katsu against the smooth, savory curry is a textural delight.
- Rich and Complex Flavors: Japanese curry is unlike any other curry. It’s sweet, savory, and slightly spiced, offering a depth of flavor that’s incredibly satisfying.
- Comfort Food at Its Finest: Katsu Curry is the ultimate comfort food, perfect for a cozy night in or a satisfying family meal.
- Surprisingly Easy to Make: Despite its impressive flavor profile, Katsu Curry is relatively easy to make at home, with readily available ingredients.
- Customizable to Your Taste: You can easily adjust the spice level, vegetables, and toppings to create your perfect Katsu Curry experience.
Ingredients:
- Curry:
- 400g (0.9lb) onion, sliced into 1cm (⅜”) wide pieces
- 250g (0.6lb) potato, cut into 1.5cm (⅝”) cubes
- 100g (3.5oz) carrot, sliced to 7mm (¼”) thick pieces
- 1 tbsp oil (vegetable, canola, or your preferred cooking oil)
- ½ packet of 230g (0.5lb) House Vermont Curry (Mild)
- 800ml (1.7pt) water
- 4 cups cooked rice (hot) – Japanese short-grain rice is ideal, but any cooked rice will work
- 4 Chicken Cutlets, cut into 2.5cm (1”) wide strips
- Condiment (optional):
- 4 tbsp fukujinzuke (Japanese pickled vegetables)
Preparation:
Step 1: Sauté the Onions:
Begin by heating the oil in a large pot or Dutch oven over medium-high heat. Add the sliced onions and sauté for approximately 5-7 minutes, or until they become translucent and their edges begin to caramelize slightly. This step is crucial for building the foundation of the curry’s flavor, as the caramelization process releases the onions’ natural sweetness and creates a richer, more complex taste. Stir frequently to prevent burning.
Step 2: Add the Potatoes and Carrots:
Introduce the cubed potatoes and sliced carrots to the pot. Stir them in with the sautéed onions and continue cooking for another 2-3 minutes, ensuring that the surfaces of the vegetables begin to cook and lightly brown. This initial cooking helps to develop their flavors and prevents them from becoming mushy later on.
Step 3: Simmer the Vegetables:
Pour the water into the pot, increasing the heat to bring the mixture to a boil. Once boiling, reduce the heat to medium-low, cover the pot with a lid, and allow the vegetables to simmer for approximately 7 minutes, or until they are nearly cooked through. The potatoes and carrots should be tender but still hold their shape.
Step 4: Incorporate the Curry Roux:
Break the curry roux cake into smaller blocks along the pre-scored lines. Add these blocks to the pot, stirring gently to ensure that the curry roux is evenly distributed and begins to dissolve. The curry roux is the heart of the flavor, infusing the vegetables with its unique blend of spices and aromatics.
Step 5: Simmer and Thicken the Curry:
Reduce the heat to low, replace the lid, and continue to cook the curry for approximately 10 minutes, or until the curry roux is completely dissolved and the sauce has thickened to your desired consistency. Stir occasionally to prevent the curry from sticking to the bottom of the pot. The curry should have a smooth, velvety texture, similar to béchamel sauce. If the curry becomes too thick, add a small amount of water to thin it out. Conversely, if it’s too thin, continue cooking without the lid to allow the sauce to reduce and thicken. Remember that the curry will thicken further as it cools.
Step 6: Serving:
Place a cup of hot cooked rice onto one side of a plate. Arrange the chicken cutlet pieces next to the rice, leaning them slightly against the rice to create a small space for the curry. Carefully pour the curry next to the chicken cutlet, allowing it to pool around the base. If desired, add a side of fukujinzuke (Japanese pickled vegetables) to complement the dish. Serve immediately and enjoy.
COOKING Rating:
- Ease of Preparation: 3/5 (Moderate)
- Flavor Complexity: 5/5 (Exceptional)
- Kid-Friendly: 4/5 (Most kids enjoy the mild flavor)
Serving Suggestions:
- Serve with a side of Japanese pickled vegetables (fukujinzuke) for a tangy contrast.
- Garnish with chopped green onions or sesame seeds for added flavor and visual appeal.
- Pair with a crisp green salad for a balanced meal.
- For a spicier kick, add a dash of chili oil or red pepper flakes.
Tips:
- Sautéing the onions properly is crucial. Don’t rush this step, as it’s essential for developing the curry’s flavor base.
- Adjust the amount of curry roux to your liking. If you prefer a milder flavor, use slightly less. For a richer, more intense flavor, use the full amount.
- Don’t overcook the vegetables. They should be tender but still retain some texture.
- Stir the curry occasionally while it simmers. This will prevent it from sticking to the bottom of the pot and ensure even cooking.
- If the curry becomes too thick, add a little water. If it’s too thin, cook it a bit longer without the lid.
- Feel free to add other vegetables to the curry. Mushrooms, bell peppers, or eggplant would all be delicious additions.
- For a vegetarian option, substitute the chicken cutlets with tofu or vegetable cutlets.
Prep Time: 20 minutes
Cook Time: 45 minutes
Total Time: 1 hour 5 minutes
Nutritional Information (per serving, approximate):
- Calories: 750-850
- Protein: 35-45g
- Sodium: 800-1000mg (depending on the curry roux used)
Conclusion:
Katsu Curry is more than just a meal; it’s an experience. The combination of crispy chicken, flavorful curry, and fluffy rice is a guaranteed crowd-pleaser. With this recipe, you can easily recreate this Japanese classic in your own kitchen and enjoy a taste of comfort and culinary excellence. Don’t be afraid to experiment with different vegetables, toppings, and spice levels to create your own signature Katsu Curry. The possibilities are endless!
Questions and Answers about this recipe:
- Can I use a different type of curry roux?
- Absolutely! House Vermont Curry is a popular choice, but there are many other brands and varieties available. Experiment with different flavors, such as medium-hot or hot, to find your perfect spice level. Just be sure to adjust the amount of roux according to the package instructions.
- Can I make this recipe ahead of time?
- Yes, Katsu Curry can be made ahead of time. In fact, the flavors often meld together and improve overnight. Store the curry and chicken cutlets separately in airtight containers in the refrigerator. When ready to serve, reheat the curry gently on the stovetop or in the microwave and re-crisp the chicken cutlets in the oven or a skillet.
- What’s the best way to cook the rice for Katsu Curry?
- Japanese short-grain rice is the traditional choice for Katsu Curry. It has a slightly sticky texture that complements the curry perfectly. However, you can use any type of rice you prefer. Just be sure to cook it according to the package instructions. A rice cooker is a convenient way to ensure perfectly cooked rice every time.
- Can I freeze Katsu Curry?
- While you can freeze Katsu Curry, the texture of the potatoes and carrots may change slightly. The curry itself freezes well. Store the curry in an airtight container in the freezer for up to 2-3 months. The chicken cutlets are best enjoyed fresh, as they can become soggy when frozen and thawed.
- What are some good substitutions for fukujinzuke?
- If you can’t find fukujinzuke, you can substitute it with other pickled vegetables, such as kimchi, pickled ginger, or even a simple cucumber pickle. The key is to have a tangy and slightly sweet element to balance the richness of the curry.