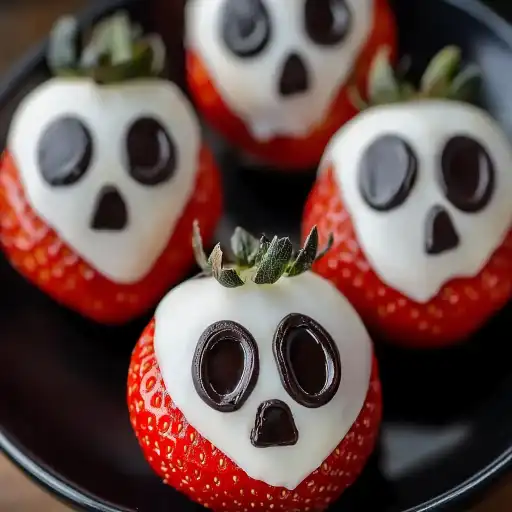
Description of this recipe: These spooky-cute Ghost and Mummy Strawberries are the perfect Halloween treat for school parties, lunchboxes, or a fun family activity. Fresh strawberries dipped in creamy white chocolate and decorated to resemble ghosts and mummies, these snacks are not only delicious but also healthy and festive. They’re easy to make, kid-friendly, and sure to be a hit with everyone.
Why you will love this recipe:
- Healthy & Fun: A creative way to incorporate fruit into Halloween celebrations, offering a healthier alternative to traditional sugary candies.
- Easy to Make: With just a few simple ingredients and minimal effort, you can whip up a batch of these delightful treats in no time.
- Kid-Friendly: Get the kids involved in the decorating process for a memorable and engaging activity.
- Versatile: Perfect for school parties, Halloween gatherings, or simply a fun snack at home.
- Customizable: Easily adapt the decorations to your liking – use different colored candies, sprinkles, or edible markers for unique designs.
Ingredients:
- 12 large fresh strawberries, washed and completely dried
- 1 cup white candy melts or white chocolate chips (about 170g)
- Mini chocolate chips (for eyes and mouth for Ghost Strawberries)
- Candy eyes (for Mummy Strawberries)
- Small piping bag or ziplock bag with a snipped corner
- Almond bark
Preparation:
Step 1: Prep the Strawberries: Wash the strawberries thoroughly under cold water and pat them completely dry with a paper towel. Moisture is the enemy of a smooth chocolate coating, so ensure they are bone dry. Remove the green stems after washing to prevent water from seeping into the berry.
Step 2: Melt the Chocolate (for Ghost Strawberries): In a microwave-safe bowl, place the white candy melts or white chocolate chips. Microwave in 30-second intervals, stirring well after each interval, until the chocolate is completely melted and smooth. Be careful not to overheat the chocolate, as it can seize up. Alternatively, you can melt the chocolate in a double boiler over low heat, stirring constantly.
Step 3: Create Ghost Strawberries: Hold a strawberry by the top (where the stem was) and dip it into the melted white chocolate, swirling to ensure it’s fully coated. Lift the strawberry out and let any excess chocolate drip back into the bowl. Place the dipped strawberry on a parchment-lined baking sheet. Immediately add two mini chocolate chips for the eyes and a few more for the mouth while the chocolate is still wet. The chocolate acts like glue, securing the chips in place. Repeat with the remaining strawberries.
Step 4: Melt the Chocolate (for Mummy Strawberries): In a microwave-safe bowl, place the white candy melts or white chocolate chips. Microwave in 30-second intervals, stirring well after each interval, until the chocolate is completely melted and smooth. Be careful not to overheat the chocolate, as it can seize up. Alternatively, you can melt the chocolate in a double boiler over low heat, stirring constantly.
Step 5: Create Mummy Strawberries: Dip each strawberry completely in the melted chocolate as previously outlined. Allow the chocolate to partially set for a more dimensional mummy look.
Step 6: Mummy Bandages: Once the chocolate is partially set, transfer more melted chocolate into the piping bag or a ziplock bag with a very small corner snipped off. Drizzle the melted chocolate back and forth across the strawberry to create the look of mummy bandages. Don’t worry about making them perfectly straight; the more haphazard, the better!
Step 7: Add Eyes: Before the chocolate drizzle hardens, gently press two candy eyes onto the front of the strawberry where the mummy’s eyes would be.
Step 8: Chill and Serve: Place the baking sheet with the decorated strawberries in the refrigerator for 10-15 minutes, or until the chocolate is firm and set. This will help the chocolate adhere to the strawberries and prevent them from melting at room temperature.
COOKING Rating: Easy
Serving Suggestions:
- Serve these spooky strawberries as a fun and healthy Halloween snack at school parties, playdates, or family gatherings.
- Arrange them on a platter with other Halloween-themed treats like candy corn, pumpkin cookies, or ghost-shaped marshmallows.
- Pack them in lunchboxes for a festive surprise.
- Use them as a decorative element on a Halloween dessert table.
- Enjoy them as a guilt-free sweet treat after a Halloween dinner.
Tips:
- Ensure strawberries are completely dry before dipping to help the chocolate adhere properly.
- Use high-quality chocolate or candy melts for the best flavor and texture.
- Work quickly while decorating, as the chocolate sets fast.
- If the chocolate starts to thicken, microwave it for a few seconds to re-melt it.
- Get creative with your decorations – use different colored candies, sprinkles, or edible markers to personalize your strawberries.
- For a vegan option, use vegan white chocolate and check the candy eyes to ensure they are vegan as well.
- If you don’t have candy melts, you can use almond bark
Prep Time: 15 minutes
Cook Time: 5 minutes
Total Time: 20 minutes
Nutritional Information (per strawberry, approximate):
Calories: 80-100 (depending on the type of chocolate used)
Protein: 1g
Sodium: 5-10mg
Conclusion:
These Ghost and Mummy Strawberries are a delightful way to celebrate Halloween without sacrificing health or fun. They are easy to make, visually appealing, and incredibly delicious. Whether you’re making them for a school party, a Halloween gathering, or simply a spooky snack at home, these festive treats are guaranteed to be a crowd-pleaser. Get creative with your decorations, involve the kids, and enjoy the sweet and spooky spirit of Halloween!
Questions and Answers:
- Can I use regular chocolate instead of white chocolate?
- Absolutely! While this recipe calls for white chocolate to create the ghost and mummy effect, you can definitely use regular milk chocolate or dark chocolate if you prefer. The taste will be different, but still delicious. You could create other Halloween-themed designs with different chocolates, such as spiderweb strawberries with dark chocolate or pumpkin-colored strawberries with orange candy melts.
- How can I prevent the chocolate from seizing up when melting it?
- The key to preventing chocolate from seizing is to avoid overheating it and to prevent any water from getting into the chocolate. Microwave the chocolate in short intervals (30 seconds is best), stirring well after each interval. If melting in a double boiler, make sure the bottom of the bowl doesn’t touch the water. If the chocolate does seize, try adding a teaspoon of vegetable oil or shortening and stirring vigorously until it becomes smooth again.
- Can I make these ahead of time?
- While these strawberries are best enjoyed fresh, you can make them a few hours ahead of time. Store them in the refrigerator in an airtight container lined with parchment paper to prevent them from sticking together. Keep in mind that the chocolate may start to “sweat” if stored for too long, so it’s best to make them as close to serving time as possible.
- What if I don’t have candy eyes?
- No problem! You can use mini chocolate chips, black sesame seeds, or even dots of melted chocolate to create the eyes. If you’re feeling creative, you can use edible markers to draw eyes directly onto the chocolate.
- Are there any variations I can try?
- Absolutely! The possibilities are endless. Try using different colored candy melts to create other Halloween characters, such as green for Frankenstein or orange for pumpkins. You can also add sprinkles, edible glitter, or crushed nuts for extra texture and flavor. Consider dipping the strawberries in caramel before dipping them in the chocolate for a caramel apple-inspired treat.