Description of this recipe
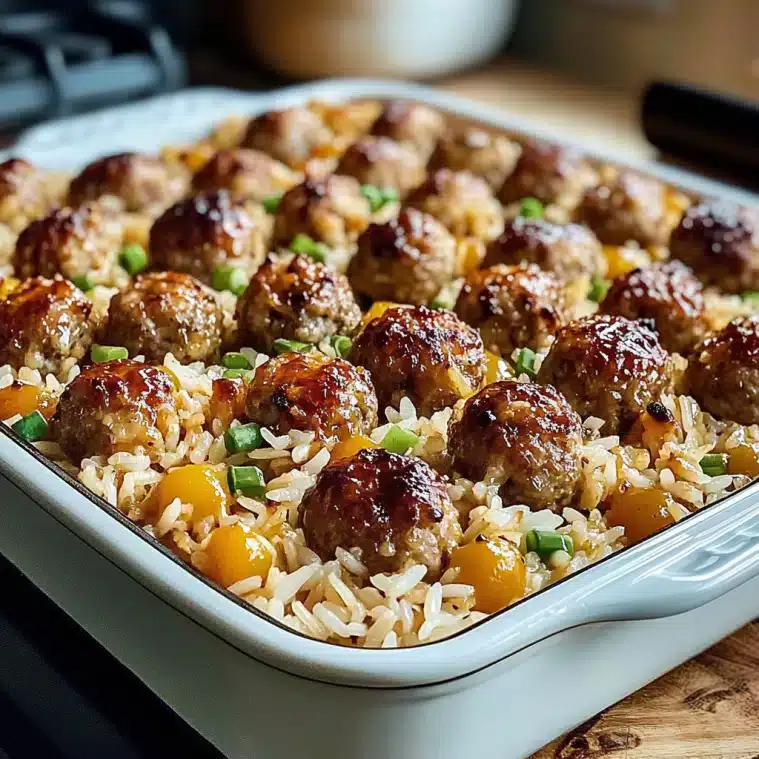
This Honey Garlic Meatball Rice Bake is the ultimate comfort food, combining the simplicity of a one-pan dish with an explosion of sweet and savory flavors. Imagine tender, juicy meatballs glazed in a luscious honey garlic sauce, nestled over a bed of fluffy rice. This recipe transforms everyday ingredients into a delightful meal that’s perfect for busy weeknights or cozy weekends. It’s an easy, satisfying way to get a balanced dinner on the table with minimal effort.
Why you will love this recipe
You’ll absolutely adore this Honey Garlic Meatball Rice Bake because it’s incredibly versatile and customizable. Got picky eaters? No problem! The sweet and savory sauce is universally appealing, and you can easily sneak in extra veggies. The one-pan format means fewer dishes to wash, and the leftovers (if there are any!) taste just as amazing the next day. It’s also a budget-friendly meal, using simple pantry staples and frozen meatballs to create a dish that tastes like a gourmet treat. Plus, the aroma that fills your kitchen as it bakes is simply irresistible.
Ingredients:
For the base:
- 3 cups cooked white rice (or jasmine)
- 1½ cups frozen fully cooked meatballs (about 20–24 small)
- 1 tablespoon vegetable oil (for greasing the dish)
For the honey garlic sauce:
- ⅓ cup honey
- ¼ cup low-sodium soy sauce
- 2 tablespoons ketchup
- 2 tablespoons brown sugar
- 2 teaspoons minced garlic
- 1 teaspoon cornstarch + 1 tablespoon cold water (optional, for thickening)
Optional add-ins:
- 1 cup frozen vegetables (peas, carrots, or broccoli)
- ½ teaspoon ground ginger (for extra flavor)
- Chopped green onions or sesame seeds for garnish
Preparation:
This recipe is designed to be as straightforward and stress-free as possible. The beauty lies in its simplicity, allowing you to create a flavorful and satisfying meal with minimal hands-on time. The goal is to layer the ingredients in a way that ensures everything cooks evenly, and the sauce permeates throughout the dish.
Step 1: Preheat the Oven
Start by preheating your oven to 375°F (190°C). This ensures that the oven is at the correct temperature when you place the rice bake inside, promoting even cooking. While the oven is preheating, take a 9×13-inch baking dish and lightly grease it with vegetable oil. This prevents the rice bake from sticking to the bottom of the dish, making it easier to serve and clean up later. Use a pastry brush or a paper towel to evenly spread the oil across the surface of the dish.
Step 2: Add Rice and Meatballs
Once the baking dish is prepared, it’s time to assemble the base of the rice bake. Take your 3 cups of cooked white rice (or jasmine rice, if you prefer) and spread it evenly across the bottom of the greased baking dish. Make sure the rice is distributed uniformly to provide a consistent base for the meatballs and sauce. Next, take your 1½ cups of frozen fully cooked meatballs (about 20–24 small) and place them over the rice. There’s no need to thaw the meatballs if they are already fully cooked. Arrange the meatballs in a single layer, spacing them evenly across the rice. This ensures that each meatball is properly coated in the honey garlic sauce and heats through evenly during baking.
Step 3: Make the Sauce
While the oven is preheating and the base is being assembled, prepare the honey garlic sauce. In a medium-sized bowl, whisk together the ⅓ cup of honey, ¼ cup of low-sodium soy sauce, 2 tablespoons of ketchup, 2 tablespoons of brown sugar, and 2 teaspoons of minced garlic. Whisk the ingredients thoroughly until they are well combined and the sauce is smooth. If you want to add an extra layer of flavor, you can also include ½ teaspoon of ground ginger at this stage. For those who prefer a thicker sauce, you can prepare a cornstarch slurry by mixing 1 teaspoon of cornstarch with 1 tablespoon of cold water. Add this slurry to the sauce mixture and whisk well. The cornstarch will help to thicken the sauce during baking, giving it a glossy and luscious texture.
Step 4: Assemble
With the base and sauce ready, it’s time to assemble the rice bake. Pour the honey garlic sauce evenly over the rice and meatballs in the baking dish. Ensure that the sauce covers all the meatballs and seeps down into the rice, infusing it with flavor. If you’re using optional add-ins like 1 cup of frozen vegetables (peas, carrots, or broccoli), you can sprinkle them on top of the sauce or mix them into the rice layer. Mixing the vegetables into the rice layer ensures they are evenly distributed throughout the dish.
Step 5: Bake Covered
Once the rice bake is fully assembled, cover the baking dish tightly with aluminum foil. This helps to trap the moisture inside, preventing the rice from drying out and allowing the meatballs to steam and heat through. Place the covered baking dish in the preheated oven and bake for 30 minutes.
Step 6: Bake Uncovered
After 30 minutes of baking, carefully remove the aluminum foil from the baking dish. This allows the sauce to bubble and caramelize, creating a delicious glaze on the meatballs. Return the uncovered baking dish to the oven and bake for another 10–15 minutes, or until the sauce is bubbling and the meatballs are heated through. Keep a close eye on the rice bake during this stage to prevent the sauce from burning.
Step 7: Garnish and Serve
Once the rice bake is done, remove it from the oven and let it rest for 5–10 minutes before serving. This allows the flavors to meld together and the sauce to thicken slightly. Before serving, you can garnish the rice bake with chopped green onions, sesame seeds, or a drizzle of extra honey garlic sauce. These garnishes add a pop of color and flavor to the dish, making it even more appealing. Serve the Honey Garlic Meatball Rice Bake warm, and enjoy!
COOKING Rating:
Easy
Serving Suggestions:
This Honey Garlic Meatball Rice Bake is a complete meal in itself, but it also pairs well with a variety of side dishes. Here are a few serving suggestions to elevate your meal:
- Steamed or Roasted Vegetables: Serve alongside steamed broccoli, roasted asparagus, or sautéed green beans for a boost of nutrients and color.
- Side Salad: A crisp green salad with a light vinaigrette provides a refreshing contrast to the richness of the rice bake.
- Egg Rolls or Spring Rolls: Add a touch of Asian-inspired flair with crispy egg rolls or fresh spring rolls.
- Kimchi or Pickled Vegetables: The tangy and spicy flavors of kimchi or pickled vegetables complement the sweetness of the honey garlic sauce.
- Miso Soup: Start your meal with a warm bowl of miso soup for a comforting and traditional touch.
Tips:
- Use High-Quality Ingredients: Opt for good-quality honey and low-sodium soy sauce to enhance the flavor of the sauce.
- Customize with Vegetables: Feel free to add your favorite vegetables, such as bell peppers, mushrooms, or zucchini, to the rice bake.
- Adjust the Sweetness: If you prefer a less sweet sauce, reduce the amount of honey and brown sugar.
- Make it Spicy: Add a pinch of red pepper flakes or a dash of sriracha to the sauce for a spicy kick.
- Use Leftover Rice: This recipe is a great way to use up leftover cooked rice.
- Prepare Ahead: You can assemble the rice bake ahead of time and store it in the refrigerator until ready to bake.
- Ensure the Meatballs are Cooked Through: Since you’re starting with fully cooked meatballs, ensure they are heated all the way through. If they are still cold in the center, bake for a few more minutes.
Prep Time:
15 minutes
Cook Time:
45 minutes
Total Time:
60 minutes
Nutritional Information:
(Note: The following values are approximate and may vary based on specific ingredients and portion sizes.)
- Calories: 450
- Protein: 20g
- Sodium: 600mg
Conclusion
The Honey Garlic Meatball Rice Bake is more than just a recipe; it’s a culinary hug in a dish. Its delightful combination of sweet and savory flavors, coupled with the ease of preparation, makes it a surefire winner for any occasion. Whether you’re looking for a quick weeknight dinner, a comforting family meal, or a crowd-pleasing potluck dish, this recipe ticks all the boxes. With its customizable nature and simple ingredients, it’s a versatile addition to your cooking repertoire that you’ll find yourself turning to again and again. So, gather your ingredients, preheat your oven, and get ready to experience the magic of this delicious rice bake. Your taste buds will thank you!
Questions and Answers:
Q1: Can I use brown rice instead of white rice?
A: Absolutely! Brown rice can be a great, healthier substitute. Keep in mind that brown rice typically requires more liquid and a longer cooking time. You might need to add a bit more sauce and extend the baking time by about 15-20 minutes to ensure the rice is fully cooked and tender.
Q2: I don’t have honey. What can I use instead?
A: If you’re out of honey, maple syrup or agave nectar can work as good substitutes. They will impart a slightly different flavor, but will still provide the necessary sweetness to balance the savory elements of the dish. Alternatively, you can use brown rice syrup for a similar flavor profile.
Q3: Can I add more vegetables to this recipe?
A: Definitely! Feel free to load up on veggies. Bell peppers, mushrooms, broccoli florets, and sliced carrots are all great additions. You might want to sauté them lightly before adding them to the rice bake to ensure they’re tender and flavorful.
Q4: Is it possible to make this recipe vegetarian?
A: Yes, it is! Substitute the meatballs with plant-based meatballs or tofu cubes. If using tofu, press it to remove excess water and then pan-fry or bake it until it’s golden brown before adding it to the rice bake.
Q5: Can I prepare this dish in advance?
A: Yes, you can assemble the rice bake a day ahead of time. Just cover it tightly with plastic wrap and store it in the refrigerator. When you’re ready to bake it, let it sit at room temperature for about 30 minutes before putting it in the oven. This will help ensure even cooking. You may need to add a few extra minutes to the baking time.