Description of this recipe
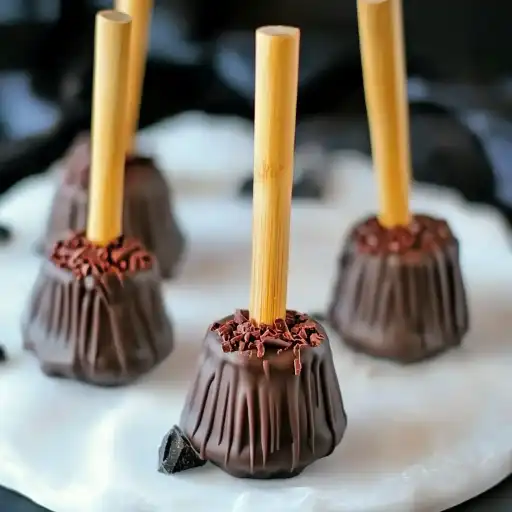
These Enchanted Chocolate Witches’ Brooms are a delightful and easy-to-make Halloween treat that will cast a spell on kids and adults alike! Crafted from simple ingredients like mini peanut butter cups, pretzel sticks, and melted chocolate, these whimsical confections require no baking and minimal effort, making them a perfect activity for a Halloween party or a fun family project. They’re not only delicious but also incredibly cute, resembling miniature witches’ brooms that will add a touch of magic to your Halloween celebrations.
Why you will love this recipe
You will fall under the spell of these Enchanted Chocolate Witches’ Brooms for several enchanting reasons:
- Effortless Elegance: These brooms require no baking and can be assembled in minutes, making them an ideal treat for busy parents or last-minute Halloween parties.
- Kid-Friendly Fun: The simple assembly process makes this a perfect activity to get kids involved in the Halloween spirit. They’ll love creating their own unique broom designs.
- Customizable Magic: From the type of chocolate used to the sprinkles and decorations, you can tailor these brooms to your personal preferences and dietary needs.
- Crowd-Pleasing Charm: These adorable treats are guaranteed to be a hit at any Halloween gathering. They’re not only delicious but also visually appealing and conversation-starters.
- Versatile Delight: While perfect for Halloween, these brooms can be adapted for other occasions by changing the decorations and colors.
Ingredients:
- 20 mini peanut butter cups (Reese’s or similar)
- 20 thin pretzel sticks (for broom handles)
- 1/4 cup chocolate chips, melted (milk, semi-sweet, or dark)
- Optional Decorations:
- Halloween sprinkles or edible glitter
- Colored candy melts (orange, green, purple)
- Small candy bows or icing pens for detail
Preparation:
Step 1: Prep the Launchpad: Begin by lining a baking sheet or tray with parchment paper. This will prevent the brooms from sticking and make cleanup a breeze. Unwrap all 20 mini peanut butter cups and arrange them on the prepared tray. Gather your pretzel sticks, chocolate chips, and any optional decorations you plan to use.
Step 2: Melt the Enchanting Elixir: In a microwave-safe bowl, combine the chocolate chips. Microwave in 30-second intervals, stirring well after each interval, until the chocolate is completely melted and smooth. Be careful not to overheat the chocolate, as it can burn and become grainy. Alternatively, you can melt the chocolate using a double boiler on the stovetop.
Step 3: Create the Broom Socket: This is a crucial step! Using a toothpick or the tip of a small knife, carefully poke a small hole in the center of the top of each peanut butter cup. This hole will serve as the socket for the pretzel stick handle. Be gentle to avoid cracking or breaking the peanut butter cups.
Step 4: Assemble the Brooms: Now comes the fun part! Dip one end of a pretzel stick into the melted chocolate, ensuring it is coated generously. Gently insert the chocolate-covered end of the pretzel stick into the hole you created in the peanut butter cup. Hold the pretzel stick in place for a few seconds until the chocolate begins to set, securing the handle to the broom. Repeat this process for all the peanut butter cups and pretzel sticks.
Step 5: Decorate and Personalize: Once the brooms are assembled, you can add your personal touch with decorations. Drizzle a little melted chocolate around the base of the broom where the pretzel stick meets the peanut butter cup for extra stability and a touch of elegance. While the chocolate is still wet, sprinkle on Halloween sprinkles, edible glitter, or colored candy melts. You can also use icing pens or small candy bows to create intricate designs and add personality to your brooms.
Step 6: Set the Magic: Allow the assembled brooms to stand at room temperature for approximately 15 minutes, or place them in the refrigerator for 5-10 minutes, until the chocolate has completely set and hardened. This will ensure that the handles are firmly attached and the decorations stay in place.
COOKING Rating:
Easy: This recipe is incredibly straightforward and requires minimal cooking skills. It’s perfect for beginners and a great way to get kids involved in the kitchen.
Serving Suggestions:
- Serve these Enchanted Chocolate Witches’ Brooms as a delightful treat at your Halloween party.
- Wrap them individually in cellophane bags and tie with ribbon for adorable party favors.
- Arrange them on a platter with other Halloween-themed desserts for a spooky and delicious spread.
- Use them as creative cupcake toppers or decorations for a Halloween cake.
- Enjoy them as a fun and festive snack while watching your favorite Halloween movies.
Tips:
- Chocolate Choices: Experiment with different types of chocolate, such as milk chocolate, semi-sweet chocolate, dark chocolate, or even white chocolate, to find your favorite flavor combination.
- Pretzel Perfection: Use thin pretzel sticks for a more delicate and realistic broom handle.
- Decoration Station: Set up a decoration station with a variety of sprinkles, edible glitter, candy melts, and icing pens to allow everyone to create their own unique broom designs.
- Nut Allergy Alternative: If you have nut allergies, you can substitute the peanut butter cups with chocolate-covered caramels or other similar candies.
- Storage Secrets: Store the finished brooms in an airtight container at room temperature for up to a week. If storing in the refrigerator, bring them to room temperature before serving for the best flavor and texture.
Prep Time:
15 minutes
Cook Time:
5 minutes
Total Time:
20 minutes
Nutritional Information:
(Estimated per broom)
Calories: 80
Protein: 1g
Sodium: 40mg
Conclusion
These Enchanted Chocolate Witches’ Brooms are a whimsical and delightful Halloween treat that will bring joy to both kids and adults. With their simple ingredients, easy assembly, and customizable decorations, they’re a perfect activity for Halloween parties, family gatherings, or a fun afternoon in the kitchen. So gather your ingredients, summon your inner witch or wizard, and create these magical brooms that will sweep everyone off their feet!
Questions and Answers:
Q1: Can I use a different type of candy instead of peanut butter cups?
A: Absolutely! If you have nut allergies or simply prefer a different flavor, you can substitute the peanut butter cups with chocolate-covered caramels, mini chocolate donuts, or even small marshmallows. Just make sure the candy is sturdy enough to hold the pretzel stick handle.
Q2: How do I prevent the chocolate from burning when melting it in the microwave?
A: The key to melting chocolate in the microwave is to do it in short intervals and stir frequently. Microwave the chocolate in 30-second bursts, stirring well after each burst, until it is completely melted and smooth. This will prevent the chocolate from overheating and burning. If you prefer, you can also melt the chocolate using a double boiler on the stovetop.
Q3: What can I use if I don’t have Halloween sprinkles?
A: No Halloween sprinkles? No problem! You can use any type of sprinkles you have on hand, such as rainbow sprinkles, chocolate sprinkles, or even sanding sugar. You can also get creative with other decorations, such as edible glitter, colored candy melts, or small candy bows.
Q4: How do I make sure the pretzel stick stays in place?
A: To ensure the pretzel stick stays securely in place, make sure to dip the end of the pretzel stick generously in melted chocolate before inserting it into the peanut butter cup. Hold the pretzel stick in place for a few seconds until the chocolate begins to set and harden. You can also drizzle a little extra melted chocolate around the base of the broom where the pretzel stick meets the peanut butter cup for added stability.
Q5: Can I make these brooms ahead of time?
A: Yes, you can definitely make these brooms ahead of time. Store the finished brooms in an airtight container at room temperature for up to a week. If storing in the refrigerator, bring them to room temperature before serving for the best flavor and texture.