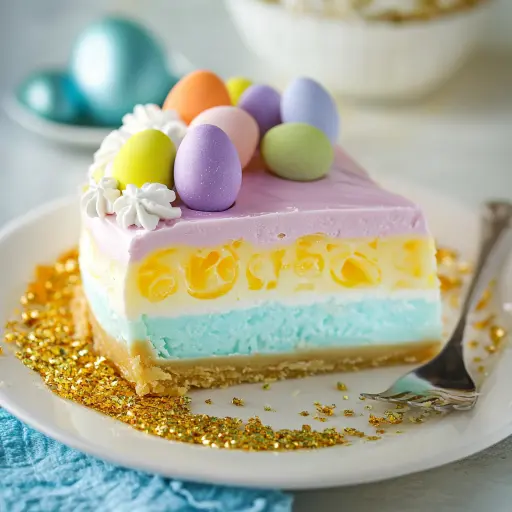
Description: This Easter Jell-O Pie, or Rainbow Jell-O Dream Pie, is a vibrant, layered dessert perfect for celebrating spring. It features a buttery graham cracker crust filled with creamy, colorful Jell-O layers, each infused with the nostalgic flavors of Starburst candies. A delightful treat for both kids and adults, it’s as visually stunning as it is delicious.
Ingredients:
Filling:
- ½ package Pink Starburst Jell-O (a little under 2 ounces)
- 1 ½ ounces Blue Jell-O (½ Package)
- 1 ½ ounces Yellow Jell-O (½ Package)
- 1 ½ ounces Purple Jell-O (½ Package)
- 16 ounces Whipped Cream, divided
- 3 cups Boiling Water
- 1 ⅓ cup Cold Water, divided
- Yellow Food Dye (optional)
- Pink Food Dye (optional)
Crust:
- 2 ½ cups Graham Cracker Crumbs
- 12 tbsp Butter (1 ½ sticks), melted
Preparation:
Step 1: Prepare the Graham Cracker Crust
In a microwave-safe bowl, melt the butter completely. You can also melt it in a saucepan over low heat, ensuring it doesn’t burn.
In a medium-sized mixing bowl, combine the graham cracker crumbs and the melted butter. Mix thoroughly until all the crumbs are evenly moistened and the mixture resembles wet sand. This consistency is crucial for a crust that holds its shape.
Step 2: Press the Crust into the Pan
Take a springform pan (9 or 10 inch) and gently press the graham cracker mixture into the bottom and up the sides. Use the bottom of a measuring cup or your fingers to firmly pack the crumbs. This helps to create a solid and even crust. Ensure the crust is of uniform thickness for even baking and stability.
Step 3: Chill the Crust
Place the springform pan with the crust in the freezer. Freezing the crust for at least 30 minutes will help it set and prevent it from crumbling when you add the Jell-O filling. This step is crucial, especially if you live in a warmer climate.
Step 4: Prepare the Jell-O Layers
In four separate small bowls, place each color of Jell-O powder (Pink, Blue, Yellow, and Purple).
In each bowl, add ¾ cup of boiling water. Stir continuously until the Jell-O powder is completely dissolved and no grains remain at the bottom. This ensures a smooth and even texture.
Next, add ⅓ cup of cold water to each bowl and stir gently to combine. This step helps to cool down the Jell-O mixture and prepare it for setting.
Step 5: Thicken the Jell-O
Place all four bowls of Jell-O in the refrigerator for approximately 20-30 minutes. You’re aiming for a slightly thickened consistency, like a soft gel, but not completely solidified. This partially set state is essential for the whipped cream to incorporate smoothly and for the layers to adhere to each other without bleeding colors.
Step 6: Incorporate the Whipped Cream
Remove the bowls of Jell-O from the refrigerator. In each bowl, add 4 ounces of whipped cream.
Vigorously mix the whipped cream into the Jell-O until fully combined. This may take a minute or two per bowl. You want the mixture to be smooth and uniform in color. The whipped cream adds a creamy texture and reduces the intensity of the Jell-O flavor, creating a more balanced and enjoyable dessert.
Step 7: Enhance the Color (Optional)
If you want to enhance the colors, add a drop or two of yellow or pink food dye to the corresponding Jell-O mixtures (Yellow and Pink). Stir until the color is evenly distributed and you’ve achieved your desired shade. Use gel food coloring for best results, as liquid food coloring can sometimes dilute the mixture.
Step 8: Layer the Jell-O in the Crust
Remove the crust from the freezer. Pour the first color of Jell-O mixture (e.g., yellow) into the crust and spread it evenly.
Return the pie to the freezer for 5 minutes to allow the first layer to partially set. This prevents the colors from mixing and creates defined layers.
Repeat the process with the remaining colors, one at a time, placing the pie back in the freezer for 5 minutes between each layer. This layering technique is crucial for achieving the rainbow effect.
Step 9: Chill to Set
Once all four colors have been layered, place the pie back in the freezer for 3-4 hours, or until the Jell-O is completely solidified all the way through. The longer the pie chills, the better it will set, resulting in clean slices.
Step 10: Final Touches and Serving
Before serving, you can top the pie with additional whipped cream if desired. This adds a final touch of elegance and complements the flavors.
To release the pie from the springform pan, run a thin knife along the edge of the crust to loosen it. Then, gently open the latch and lift the pie from the base.
Slice the pie and serve chilled.
Why You Will Love This Recipe:
- Visually Stunning: The vibrant layers of colorful Jell-O make this pie a showstopper. It’s perfect for parties, holidays, or any occasion where you want to impress.
- Deliciously Creamy: The combination of Jell-O and whipped cream creates a smooth, rich, and satisfying texture. The flavors are reminiscent of childhood, yet sophisticated enough for adult palates.
- Easy to Make: Despite its impressive appearance, this pie is surprisingly easy to prepare. The steps are straightforward, and the recipe requires minimal baking skills.
- Customizable: You can easily customize the colors and flavors to suit your preferences or the theme of your event. Use different Jell-O flavors, add fruit pieces, or decorate with sprinkles for a personalized touch.
- Make-Ahead Friendly: This pie can be made several days in advance and stored in the freezer, making it a convenient option for busy hosts.
Serving Suggestions:
- Serve the Rainbow Jell-O Dream Pie chilled.
- Garnish with extra whipped cream, fresh berries, or rainbow sprinkles.
- Pair it with a light and refreshing beverage, such as lemonade or iced tea.
- Cut the pie into neat slices for easy serving.
- For an extra touch, drizzle a little melted white chocolate over the top.
Tips:
- Use a high-quality springform pan to ensure easy release and a clean presentation.
- Make sure the graham cracker crust is firmly packed to prevent it from crumbling.
- Allow each Jell-O layer to partially set in the freezer before adding the next layer to prevent colors from mixing.
- Use gel food coloring for more vibrant and concentrated colors.
- Store the pie in the freezer to maintain its shape and texture.
- If the pie sticks to the pan, try dipping the bottom of the pan in warm water for a few seconds before releasing it.
Prep Time: 30 minutes Cook Time: 0 minutes (chilling time is approximately 3-4 hours) Total Time: 3 hours 30 minutes – 4 hours
Nutritional Information: (Approximate, per serving)
- Calories: 350
- Protein: 5g
- Sodium: 150mg
Conclusion:
The Rainbow Jell-O Dream Pie is more than just a dessert; it’s a celebration of color, flavor, and fun. Its vibrant layers, creamy texture, and nostalgic flavors make it a guaranteed crowd-pleaser. Whether you’re hosting an Easter brunch, a summer barbecue, or a birthday party, this pie is sure to be the star of the show. Easy to make and endlessly customizable, it’s a recipe that will bring joy to both the baker and the eater. So go ahead, embrace your inner artist, and create a Rainbow Jell-O Dream Pie that will delight and inspire.
Question and Answers:
Q1: Can I use different flavors of Jell-O for this recipe?
A: Absolutely! While this recipe calls for Pink Starburst, Blue, Yellow, and Purple Jell-O, you can experiment with any flavors you like. Consider using complementing flavors like orange, lime, and strawberry for a citrusy twist, or stick to classic fruit flavors. Just ensure you have enough Jell-O powder to make the four distinct layers.
Q2: Can I substitute the whipped cream with a lighter alternative?
A: Yes, you can substitute the whipped cream with a lighter alternative such as light whipped topping or even a combination of Greek yogurt and a sweetener like honey or maple syrup. However, keep in mind that the texture and flavor will be slightly different. The whipped cream contributes to the pie’s creamy richness, so a lighter alternative may result in a less indulgent dessert. Adjust the amount of sweetener to your liking if using Greek yogurt.
Q3: Can I make this pie in advance?
A: Definitely! The Rainbow Jell-O Dream Pie is an excellent make-ahead dessert. In fact, it benefits from chilling in the freezer for an extended period, allowing the Jell-O layers to fully set. You can prepare it up to 2-3 days in advance and store it in the freezer until you’re ready to serve it. Just be sure to cover it tightly to prevent freezer burn.
Q4: What if my Jell-O layers are bleeding into each other?
A: Bleeding colors often occur when the Jell-O layers are not sufficiently chilled before adding the next layer. Ensure that each layer is partially set in the freezer for at least 5 minutes before pouring the next one on top. This will help to create distinct layers and prevent the colors from mixing. Also, avoid pouring hot Jell-O mixtures onto partially set layers.
Q5: Can I use a pre-made graham cracker crust instead of making one from scratch?
A: Yes, using a pre-made graham cracker crust is a convenient option if you’re short on time. However, keep in mind that the quality and flavor of pre-made crusts can vary. For the best results, choose a high-quality pre-made crust or consider making your own from scratch for a more flavorful and homemade experience. A homemade crust also allows you to control the sweetness and texture.