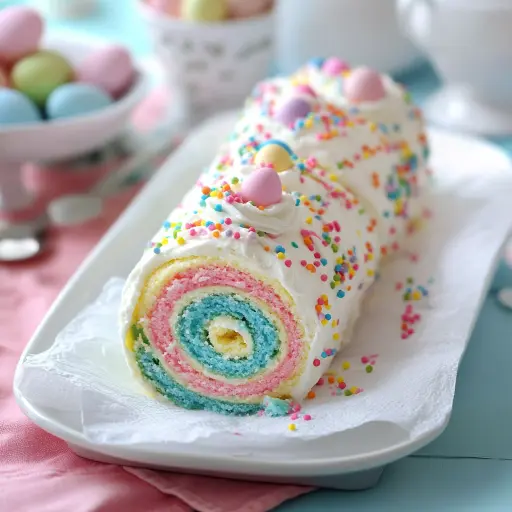
Description: This Easter Cake Roll is a festive and visually stunning dessert that’s perfect for celebrating the spring holidays. A light and airy sponge cake, marbled with pastel colors, is filled with a luscious whipped cream and then rolled into a beautiful, show-stopping centerpiece. Easy to customize and always a crowd-pleaser!
Ingredients:
For the Cake:
- 3 large eggs
- 3/4 cup granulated sugar
- 1 teaspoon vanilla extract
- 1 tablespoon vegetable oil
- 1/4 cup milk
- 3/4 cup all-purpose flour
- 1 teaspoon baking powder
- Pinch of salt
- Gel food coloring (pastel pink, green, blue, yellow)
For the Filling:
- 1 1/2 cups heavy whipping cream
- 1/4 cup powdered sugar
- 1/2 teaspoon vanilla extract
Topping (optional):
- Whipped cream
- Pastel sprinkles
Preparation:
Step 1: Preheat and Prepare: Begin by preheating your oven to 350°F (175°C). This ensures the cake bakes evenly. Prepare a 10×15-inch jelly roll pan by lining it with parchment paper. This will prevent the cake from sticking and make it easy to remove. Lightly grease the parchment paper with cooking spray or butter to further ensure a clean release.
Step 2: Whip the Eggs and Sugar: In a large mixing bowl, combine the eggs and granulated sugar. Using an electric mixer (stand mixer or hand mixer), beat the mixture on medium-high speed for 5-7 minutes, or until it becomes thick, pale, and almost doubled in volume. This step is crucial for incorporating air into the batter, which will result in a light and fluffy cake. The mixture should ribbon when the beaters are lifted.
Step 3: Incorporate Wet Ingredients: Once the egg and sugar mixture is properly whipped, reduce the mixer speed to low. Add the vanilla extract, vegetable oil, and milk. Mix until just combined. Be careful not to overmix, as this can deflate the batter.
Step 4: Combine Dry Ingredients: In a separate bowl, whisk together the all-purpose flour, baking powder, and salt. This ensures that the baking powder is evenly distributed throughout the flour, leading to a more consistent rise in the cake.
Step 5: Combine Wet and Dry: Gradually add the dry ingredients to the wet ingredients, mixing on low speed until just combined. Be careful not to overmix; a few streaks of flour are okay. Overmixing will develop the gluten in the flour, resulting in a tough cake.
Step 6: Divide and Color the Batter: Divide the batter evenly into four separate bowls. Add a different pastel gel food coloring to each bowl (pink, green, blue, yellow) and gently mix until the color is evenly distributed. Use gel food coloring rather than liquid, as it provides a more intense color without thinning the batter.
Step 7: Create the Marble Effect: Spoon dollops of each colored batter randomly onto the prepared jelly roll pan. Use a skewer or knife to gently swirl the colors together, creating a marbled effect. Avoid over-swirling, as this can muddy the colors.
Step 8: Bake the Cake: Bake in the preheated oven for 10-12 minutes, or until the cake springs back lightly when touched in the center. Keep a close eye on the cake to prevent it from overbaking, which can make it dry and brittle.
Step 9: Roll the Cake: Immediately after removing the cake from the oven, turn it out onto a clean kitchen towel that has been generously dusted with powdered sugar. Gently peel off the parchment paper from the back of the cake. Starting from one of the short ends, roll the cake up tightly in the towel, like a jelly roll. This step is crucial for training the cake to hold its shape when it’s filled.
Step 10: Cool the Cake: Let the rolled cake cool completely in the towel. This may take about 30-45 minutes. Cooling the cake rolled up in the towel prevents it from cracking when you unroll it later.
Step 11: Prepare the Filling: While the cake is cooling, prepare the whipped cream filling. In a large mixing bowl, combine the heavy whipping cream, powdered sugar, and vanilla extract. Beat with an electric mixer until stiff peaks form. Be careful not to overwhip the cream, or it will become grainy.
Step 12: Fill and Re-roll: Once the cake has cooled completely, gently unroll it. Spread the whipped cream filling evenly over the cake, leaving a small border around the edges. Carefully re-roll the cake, using the towel to help guide it.
Step 13: Chill and Decorate: Wrap the cake roll tightly in plastic wrap and chill in the refrigerator for at least 30 minutes to allow the filling to set. Before serving, frost the top of the cake roll with additional whipped cream (optional) and decorate with pastel sprinkles.
Step 14: Slice and Serve: Slice the cake roll into even slices and serve chilled.
Why You Will Love This Recipe:
This Easter Cake Roll is more than just a dessert; it’s an experience! The delightful combination of a light, colorful sponge cake and a creamy, dreamy whipped cream filling is simply irresistible. The pastel colors make it visually appealing, especially for an Easter celebration. It’s also a fun recipe to make, allowing for creativity in designing the marbled effect. It’s a guaranteed crowd-pleaser and is a welcome change from traditional Easter desserts. It’s also relatively easy to make, though it might seem intimidating at first. Plus, the soft, melt-in-your-mouth texture will make you crave more!
Serving Suggestions:
- Serve chilled as a dessert after your Easter brunch or dinner.
- Accompany with fresh berries, such as strawberries, raspberries, or blueberries, for a burst of fresh flavor.
- Dust with additional powdered sugar for an elegant touch.
- Offer alongside a cup of coffee or tea.
- Cut into smaller slices for individual servings at a party.
- Pair with a scoop of vanilla ice cream for an extra indulgent treat.
Tips:
- Roll the Cake While Warm: Rolling the cake while it is still warm is crucial to prevent cracking. The warmth makes the cake more pliable.
- Use Gel Food Coloring: Gel food coloring provides a more vibrant color without adding extra liquid to the batter, which can affect the cake’s texture.
- Don’t Overbake: Overbaking can result in a dry and brittle cake that is prone to cracking. Keep a close eye on it while it’s in the oven.
- Powdered Sugar is Key: Dusting the towel with powdered sugar prevents the cake from sticking and helps create a smooth surface.
- Chill Before Serving: Chilling the cake roll before slicing helps the filling set and makes the slices cleaner.
- Make Ahead: The cake roll can be made a day in advance and stored in the refrigerator, wrapped tightly in plastic wrap.
- Variations: Experiment with different flavors in the filling, such as lemon zest, almond extract, or even a layer of fruit jam.
Prep Time: 25 minutes
Cook Time: 12 minutes
Cool + Chill Time: 45 minutes
Total Time: 1 hour 22 minutes
Nutritional Information: (per slice, approximate)
- Calories: 230 kcal
- Protein: 3g
- Sodium: 50mg
Conclusion:
This Easter Cake Roll recipe is a delightful and festive dessert that is sure to impress your family and friends. With its vibrant pastel colors, light and airy texture, and creamy filling, it’s the perfect centerpiece for your Easter celebration. Don’t be afraid to get creative with the decorations and flavors to make it your own! The process is easy, and the end result will be worth the effort. This cake is a great way to add a touch of spring to your Easter table, creating a beautiful and delicious experience for everyone. Now, go ahead and bake this cake.
Questions and Answers:
Q1: Can I use a different type of flour for this recipe?
A1: While all-purpose flour is recommended for its versatility and ability to create a light and airy cake, you can substitute with cake flour for an even more tender crumb. Avoid using bread flour, as it will result in a tougher cake due to its higher gluten content. If using gluten-free flour, choose a blend specifically formulated for baking, and you may need to add a binder like xanthan gum to improve the cake’s structure.
Q2: Can I make the cake roll ahead of time?
A2: Absolutely! The cake roll can be made up to 24 hours in advance. Wrap it tightly in plastic wrap and store it in the refrigerator. This allows the flavors to meld together and the filling to set properly, making it easier to slice and serve. Just be sure to add the final whipped cream topping and sprinkles shortly before serving to prevent them from becoming soggy.
Q3: My cake cracked when I rolled it. What did I do wrong?
A3: Cracking is a common issue with cake rolls. The most likely culprit is that the cake cooled down too much before you rolled it. Rolling the cake while it is still warm and pliable is crucial. Another factor could be overbaking, which makes the cake dry and brittle. Be sure to follow the baking time closely and check for doneness by gently pressing the center of the cake. Also, ensure the towel is generously dusted with powdered sugar to prevent sticking.
Q4: Can I use a different type of filling?
A4: Of course! While whipped cream is a classic choice, you can get creative with the filling. Consider using a cream cheese frosting, a lemon curd, a berry compote, or even a chocolate ganache. Just make sure the filling is not too heavy or wet, as it could cause the cake to become soggy. Adjust the amount of filling to your liking, but avoid overfilling, as this can make it difficult to roll the cake without it oozing out.
Q5: What if I don’t have gel food coloring? Can I use liquid food coloring?
A5: Gel food coloring is preferred because it provides a more concentrated color without thinning the batter. However, if you only have liquid food coloring, you can use it, but you may need to use more to achieve the desired pastel shades. Be mindful that adding too much liquid can affect the consistency of the batter, so add it sparingly. You might also want to reduce the amount of milk slightly to compensate for the extra liquid.