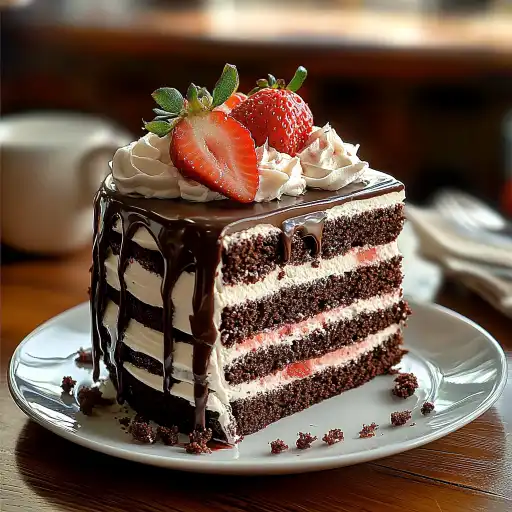
This Chocolate Strawberry Layer Cake is a decadent and visually stunning dessert that combines the rich, intense flavor of chocolate with the bright, fresh taste of strawberries. Perfect for special occasions, celebrations, or simply when you crave an extraordinary treat, this cake is sure to impress your family, friends, or even yourself.
Why you will love this recipe
You’ll fall in love with this recipe because it’s more than just a cake; it’s an experience. The moist chocolate cake layers, infused with a hint of coffee to enhance the chocolate’s depth, are perfectly complemented by a luscious chocolate ganache filling. Fresh strawberries and a dollop of whipped cream add a burst of freshness and lightness, balancing the richness of the chocolate. The cake is beautiful, delicious, and surprisingly achievable for a home baker.
Ingredients:
For the cake layers:
- 2 cups all-purpose flour
- 2 cups granulated sugar
- ¾ cup unsweetened cocoa powder
- 2 tsp baking powder
- 1 ½ tsp baking soda
- 1 tsp salt
- 1 cup buttermilk, room temperature
- ½ cup vegetable oil
- 2 large eggs, room temperature
- 2 tsp vanilla extract
- 1 cup hot coffee (or hot water for a milder flavor)
For the chocolate filling/ganache:
- 2 cups heavy cream
- 16 oz (450 g) semi-sweet chocolate, finely chopped
- 2 tbsp unsalted butter
For topping & garnish:
- Whipped cream (homemade or store-bought)
- Fresh strawberries
- Cocoa powder (for dusting, optional)
Preparation:
Step 1: Preheat and Prep
Preheat your oven to 350°F (175°C). Prepare three 9-inch round cake pans by greasing them thoroughly. Line the bottoms with parchment paper circles. This ensures the cakes release cleanly and easily.
Step 2: Combine Dry Ingredients
In a large mixing bowl, sift together the all-purpose flour, granulated sugar, unsweetened cocoa powder, baking powder, baking soda, and salt. Sifting is crucial; it removes any lumps in the dry ingredients, ensuring they combine evenly and resulting in a smoother cake texture. This meticulous step guarantees no unpleasant surprises when biting into the final masterpiece.
Step 3: Incorporate Wet Ingredients
Add the room-temperature buttermilk, vegetable oil, room-temperature eggs, and vanilla extract to the bowl with the dry ingredients. Using a mixer (either stand or hand mixer), blend until the batter is smooth and well-combined. Ensure there are no pockets of dry ingredients remaining at the bottom of the bowl. Scrape down the sides of the bowl as needed to ensure uniformity.
Step 4: Add Hot Coffee
Gradually stir in the hot coffee (or hot water). Be careful as the batter will be quite liquid. The hot liquid helps bloom the cocoa powder, intensifying the chocolate flavor and creating a more moist cake. The batter will be relatively thin, which is normal for this recipe. Don’t worry; it will bake beautifully.
Step 5: Bake the Cake
Divide the batter evenly among the prepared cake pans. Using a kitchen scale helps to ensure each pan receives the same amount of batter, resulting in even layers. Bake in the preheated oven for 30–35 minutes, or until a toothpick inserted into the center comes out clean. Begin checking for doneness around the 30-minute mark to prevent over-baking. Over-baking will result in a dry cake.
Step 6: Cool the Layers
Let the cake layers cool in the pans for about 10 minutes before inverting them onto wire racks to cool completely. Cooling the cake layers completely before frosting them is essential. Frosting a warm cake will cause the frosting to melt and slide off, creating a mess and ruining the aesthetic of your masterpiece.
Step 7: Prepare the Ganache
While the cake layers cool, prepare the chocolate ganache. In a saucepan, heat the heavy cream over medium heat until it just begins to simmer. Be careful not to let it boil; you just want it hot enough to melt the chocolate.
Step 8: Melt the Chocolate
Remove the saucepan from the heat and pour the hot cream over the finely chopped semi-sweet chocolate and unsalted butter in a heat-safe bowl. Let it sit for about 2 minutes to allow the heat to melt the chocolate.
Step 9: Create the Ganache
Gently stir the mixture until the chocolate and butter are completely melted and the ganache is smooth and glossy. If needed, you can gently warm the mixture over a double boiler or in the microwave in short bursts, stirring in between, until smooth.
Step 10: Chill the Ganache
Cover the ganache with plastic wrap, pressing it directly onto the surface to prevent a skin from forming. Chill the ganache in the refrigerator for about 30 minutes, or until it thickens to a spreadable consistency. It should be similar to a frosting or softened butter. Watch it closely; you don’t want it to become too firm.
Step 11: Assemble the Cake
Once the cake layers are completely cool and the ganache has thickened, you can begin assembling the cake. Place one cake layer on your serving plate or cake stand.
Step 12: Frost and Repeat
Spread an even layer of the chocolate ganache over the first cake layer. Place the second cake layer on top of the ganache and repeat the process, spreading another even layer of ganache. Place the final cake layer on top.
Step 13: Frost the Entire Cake
Frost the entire cake with the remaining chocolate ganache, creating a smooth and even coating. You can create a rustic look or a more polished finish, depending on your preference. For a “drip” effect, allow some of the ganache to drip artfully down the sides of the cake.
Step 14: Add Whipped Cream
Pipe or dollop whipped cream on top of the cake. You can use a piping bag with a decorative tip for an elegant presentation, or simply spoon dollops of whipped cream onto the cake. Homemade whipped cream is always a treat, but store-bought whipped cream works just fine, too!
Step 15: Garnish with Strawberries
Garnish the cake with fresh strawberries. You can use whole strawberries, sliced strawberries, or a combination of both. Arrange the strawberries in an attractive pattern to enhance the cake’s visual appeal.
Step 16: Dust with Cocoa Powder (Optional)
Lightly dust the cake with cocoa powder, if desired. This adds a touch of elegance and enhances the chocolate flavor. Use a fine-mesh sieve to evenly distribute the cocoa powder over the cake.
COOKING Rating:
Intermediate
Serving Suggestions:
This Chocolate Strawberry Layer Cake is a showstopper and deserves to be the centerpiece of any dessert table. Serve it at room temperature for the best flavor and texture. A slice of this cake pairs perfectly with a scoop of vanilla ice cream, a cup of hot coffee, or a glass of cold milk. It is ideal for birthdays, anniversaries, holiday gatherings, or any occasion that calls for a special dessert.
Tips:
- Room Temperature Ingredients: Using room temperature ingredients, particularly the buttermilk and eggs, helps create a smooth batter and a more even cake texture.
- Don’t Overmix: Be careful not to overmix the batter, as this can result in a tough cake. Mix until just combined.
- Even Layers: For perfectly even cake layers, use a kitchen scale to weigh the batter before dividing it into the pans.
- Ganache Consistency: If the ganache becomes too thick, you can gently warm it in the microwave in short bursts, stirring in between, until it reaches a spreadable consistency.
- Strawberry Preparation: Be sure to wash and dry the strawberries thoroughly before using them to garnish the cake.
- Storage: Store leftover cake in an airtight container in the refrigerator for up to 3 days.
Prep Time:
45 minutes
Cook Time:
30-35 minutes
Total Time:
2 hours (includes cooling and chilling time)
Nutritional Information:
(Note: Nutritional information is an estimate and can vary based on specific ingredients and serving sizes)
Calories:
Approximately 550-650 per serving
Protein:
Approximately 8-10 grams per serving
Sodium:
Approximately 200-250 mg per serving
Conclusion
The Chocolate Strawberry Layer Cake is a delectable dessert that perfectly balances rich chocolate flavors with the refreshing taste of strawberries. While it may require a bit of time and effort, the end result is well worth it. Impress your guests or indulge in a slice of heaven with this unforgettable cake. Enjoy the process, savor each step, and take pride in creating a dessert that is both beautiful and delicious. This cake is not just a recipe; it’s an experience, a celebration, and a memory waiting to be made.
5 Questions and Answers about this recipe:
- Can I use a different type of chocolate for the ganache? Absolutely! While semi-sweet chocolate is used in this recipe, you can certainly experiment with other types of chocolate to suit your taste preferences. Dark chocolate will provide a richer, more intense chocolate flavor, while milk chocolate will result in a sweeter, milder ganache. Consider using a high-quality chocolate for the best results, regardless of the type you choose.
- Can I make the cake layers ahead of time? Yes, you can definitely make the cake layers ahead of time. In fact, this can be a great way to break up the preparation process and make assembling the cake less time-consuming on the day you plan to serve it. After the cake layers have cooled completely, wrap them individually in plastic wrap and store them at room temperature for up to 2 days, or in the refrigerator for up to 5 days. You can also freeze the cake layers for longer storage; just make sure they are well-wrapped to prevent freezer burn.
- What if I don’t have buttermilk? If you don’t have buttermilk on hand, there are several easy substitutes you can use. One option is to make your own buttermilk by adding 1 tablespoon of white vinegar or lemon juice to a liquid measuring cup, then filling the cup to the 1-cup line with milk. Stir and let it sit for 5 minutes, then use as directed in the recipe. Another option is to use plain yogurt or sour cream thinned with a little milk or water.
- Can I use frozen strawberries? While fresh strawberries are recommended for the best flavor and texture, you can use frozen strawberries if fresh ones are not available. Be sure to thaw the frozen strawberries completely and drain off any excess liquid before using them to garnish the cake. Keep in mind that frozen strawberries may not hold their shape as well as fresh strawberries, so they may be better suited for slicing or using in a strawberry sauce rather than using them whole.
- How can I prevent the cake layers from sticking to the pans? To ensure that the cake layers release cleanly from the pans, it’s essential to prepare the pans properly. Start by greasing the pans thoroughly with butter, shortening, or cooking spray. Then, line the bottoms of the pans with parchment paper circles. The parchment paper acts as a barrier between the cake and the pan, preventing sticking and making it easy to remove the cake layers. After baking, let the cake layers cool in the pans for about 10 minutes before inverting them onto wire racks to cool completely.