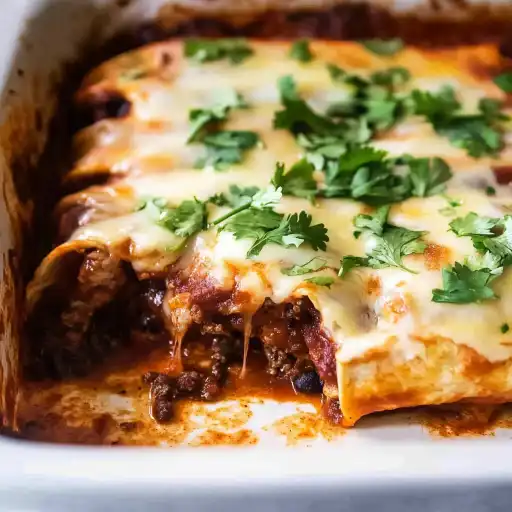
Description of this recipe
Beef enchiladas are a classic Mexican dish, featuring tortillas filled with a savory beef mixture, smothered in a flavorful enchilada sauce, and generously topped with melted cheese. This recipe offers a delicious and satisfying meal that is perfect for family dinners, gatherings, or any occasion where you want to enjoy a taste of authentic Mexican cuisine.
Why you will love this recipe
These beef enchiladas are more than just a meal; they’re an experience. Here’s why you’ll fall in love with them:
- Bursting with Flavor: The homemade spice mix and rich enchilada sauce create a symphony of flavors that will tantalize your taste buds.
- Comfort Food at Its Finest: Warm, cheesy, and packed with savory goodness, these enchiladas are the ultimate comfort food.
- Easy to Customize: You can easily adjust the spice level, add your favorite toppings, and even swap out the beef for other proteins.
- Perfect for Sharing: Enchiladas are a great dish to share with friends and family, making them ideal for potlucks, parties, and casual get-togethers.
- Make-Ahead Friendly: You can assemble the enchiladas ahead of time and bake them just before serving, saving you time and effort on busy weeknights.
Ingredients:
Spice Mix
- 1 tsp onion powder
- 1 tsp garlic powder
- 1 tbsp cumin powder
- 1 tbsp paprika
- 1 tbsp dried oregano
- ½ – 1 tsp cayenne pepper (optional, for spiciness)
Enchilada Sauce
- 2 tbsp olive oil
- 3 tbsp all-purpose flour
- 2 cups (500ml) low-sodium chicken stock/broth
- 1 ½ cups (375 ml) tomato passata OR 1 can (8 oz) canned tomato sauce
- ¼ tsp salt
- ¼ tsp pepper
Beef Filling
- 1 tbsp olive oil
- 2 garlic cloves, minced
- 1 onion, finely chopped (~1 cup)
- 1 lb / 500g ground beef (mince)
- 400g / 14oz refried beans (1 can)
- 400g / 14oz black beans, drained (1 can)
Enchiladas
- 8 tortillas (or burrito wraps)
- 1.5 cups (150g) grated melting cheese (Monterey Jack, tasty, or cheddar)
- Cilantro/coriander leaves, roughly chopped (optional garnish)
Preparation:
Step 1: Prepare the Spice Mix In a small bowl, combine the onion powder, garlic powder, cumin powder, paprika, dried oregano, and cayenne pepper (if using). Mix well and set aside. This homemade spice blend will add depth and complexity to your enchiladas.
Step 2: Make the Enchilada Sauce In a large saucepan, heat the olive oil over medium heat. Add the flour and whisk constantly to form a paste. Cook for 1 minute, stirring continuously, until the paste turns light golden. Slowly add ½ cup of the chicken broth, whisking vigorously to prevent lumps. The mixture will quickly turn into a thick, smooth paste. Add the remaining chicken broth, tomato passata or canned tomato sauce, salt, pepper, and 2 tablespoons of the spice mix. Whisk well to combine. Increase the heat slightly to medium-high. Cook for 3-5 minutes, whisking regularly, until the sauce thickens to the consistency of thick syrup. Remove from the heat and set aside. The enchilada sauce is the heart of the dish, so take your time to get it just right.
Step 3: Cook the Beef Filling Preheat your oven to 180°C/350°F. In a large skillet, heat the olive oil over high heat. Add the minced garlic and chopped onion, and cook for 2 minutes, or until the onion is softened and fragrant. Add the ground beef and cook for 2 minutes, breaking it up with a spoon as it browns. Add the remaining spice mix and cook for another 2 minutes, or until the beef is fully browned. Stir in the refried beans, drained black beans, and about ¼ cup of the enchilada sauce. Season with salt and pepper to taste. Mix well and cook for 2 minutes, allowing the flavors to meld. Remove from the heat and set aside.
Step 4: Assemble the Enchiladas Smear a thin layer of enchilada sauce on the bottom of a baking dish. This will prevent the enchiladas from sticking and add extra flavor. Place a generous amount of the beef filling on the lower third of each tortilla. Roll up the tortilla tightly and place it seam-side down in the prepared baking dish. Repeat with the remaining tortillas and filling. Pour the remaining enchilada sauce evenly over the enchiladas. Sprinkle generously with grated cheese.
Step 5: Bake the Enchiladas Cover the baking dish with foil and bake for 10 minutes. Remove the foil and bake for another 10 minutes, or until the cheese is melted, bubbly, and lightly golden brown. Remove from the oven and let the enchiladas rest for a few minutes before serving.
COOKING Rating:
- Skill Level: Medium
- Prep Time: 25 minutes
- Cook Time: 30 minutes
- Total Time: 55 minutes
Serving Suggestions:
- Garnish with fresh cilantro leaves for a pop of color and flavor.
- Serve with a dollop of sour cream or Greek yogurt for added richness.
- Pair with a side of Mexican rice and refried beans for a complete meal.
- Add a side salad with a zesty lime vinaigrette to balance the richness of the enchiladas.
- Offer a variety of toppings such as chopped tomatoes, onions, avocado, and jalapenos for guests to customize their enchiladas.
Tips:
- Spice Level: Adjust the amount of cayenne pepper to your preference. For a milder flavor, omit the cayenne pepper altogether.
- Tortilla Choice: Use corn or flour tortillas depending on your preference. Corn tortillas are more traditional, while flour tortillas are softer and easier to roll.
- Cheese Variety: Experiment with different types of cheese to find your favorite combination. Monterey Jack, cheddar, and Oaxaca cheese are all great options.
- Make Ahead: Assemble the enchiladas ahead of time and store them in the refrigerator for up to 24 hours. Bake them just before serving, adding a few extra minutes to the cooking time.
- Freezing: Enchiladas can be frozen for up to 2 months. Wrap them tightly in foil and thaw overnight in the refrigerator before baking.
Prep Time:
25 minutes
Cook Time:
30 minutes
Total Time:
55 minutes
Nutritional Information:
(Per serving, approximate)
- Calories: 450-550
- Protein: 30-35g
- Sodium: 800-1000mg
Conclusion
These beef enchiladas are a guaranteed crowd-pleaser. The combination of savory beef filling, flavorful enchilada sauce, and melted cheese creates a dish that is both comforting and satisfying. Whether you’re hosting a fiesta or simply craving a taste of authentic Mexican cuisine, this recipe is sure to impress. So gather your ingredients, roll up your sleeves, and get ready to enjoy a delicious and unforgettable meal!
Questions and Answers about this recipe:
Q1: Can I use a different type of meat in this recipe? A: Absolutely! While this recipe calls for ground beef, you can easily substitute it with shredded chicken, ground turkey, or even vegetarian options like seasoned black beans or crumbled tofu. Just adjust the cooking time accordingly.
Q2: Can I make the enchilada sauce ahead of time? A: Yes, you can! The enchilada sauce can be made up to 3 days in advance and stored in an airtight container in the refrigerator. In fact, making it ahead of time allows the flavors to meld together even more, resulting in a richer, more flavorful sauce.
Q3: What if I don’t have tomato passata? A: No problem! If you can’t find tomato passata, you can use a can of tomato sauce (8 oz) as a substitute. You can also use crushed tomatoes, but be sure to drain off any excess liquid before adding them to the sauce.
Q4: Can I add vegetables to the beef filling? A: Definitely! Feel free to add your favorite vegetables to the beef filling. Diced bell peppers, onions, corn, and zucchini are all great additions. Simply sauté the vegetables along with the garlic and onion before adding the ground beef.
Q5: How do I prevent the tortillas from getting soggy? A: To prevent the tortillas from getting soggy, avoid overfilling them with the beef filling. Also, be sure to spread a thin layer of enchilada sauce on the bottom of the baking dish before placing the enchiladas. This will help to create a barrier between the tortillas and the sauce. Finally, don’t overbake the enchiladas. Bake them just until the cheese is melted and bubbly, and the tortillas are heated through.