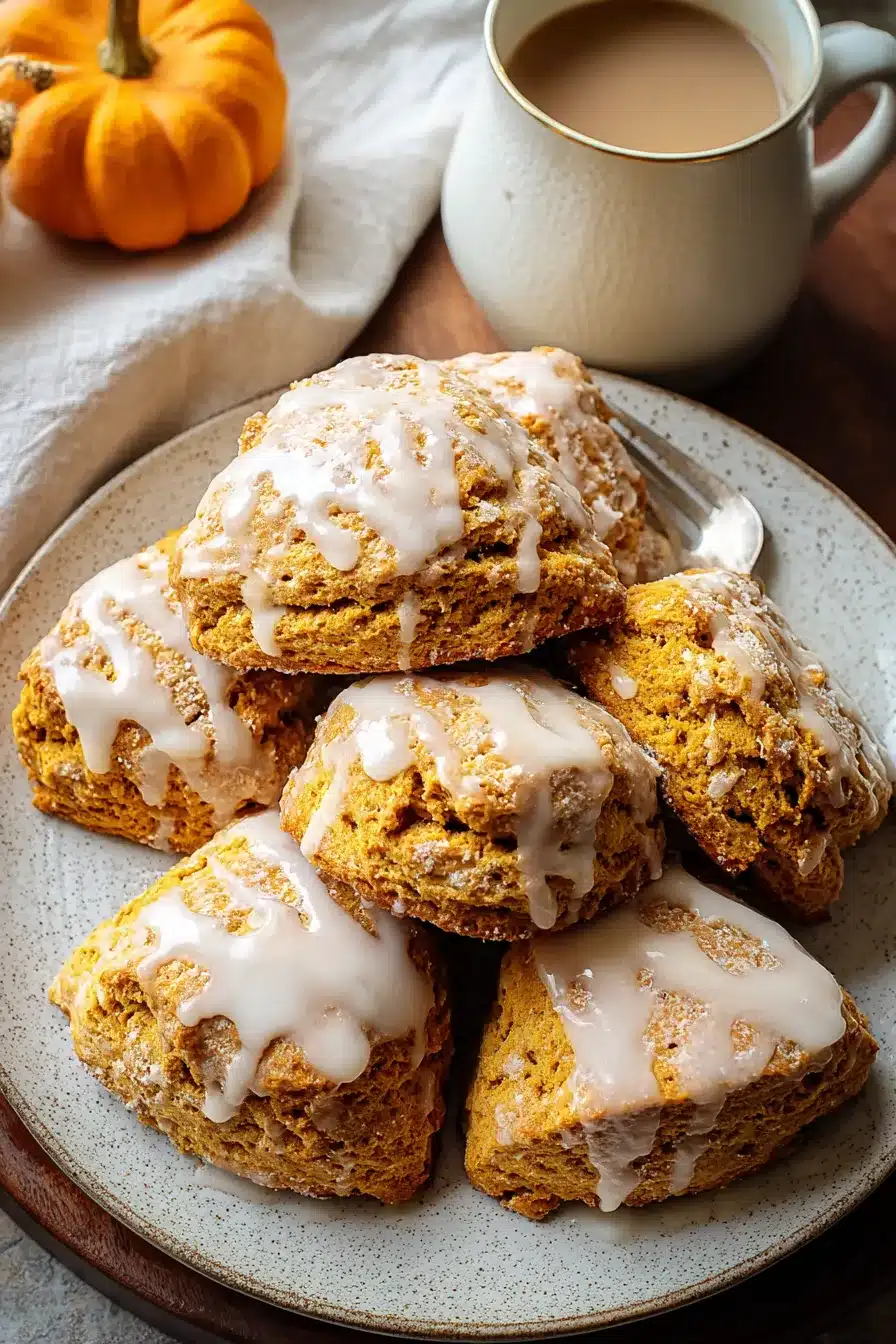
Description of this recipe: These Bakery-Style Pumpkin Scones are a delightful autumnal treat, perfect for a cozy breakfast, a comforting afternoon snack, or a festive addition to any brunch spread. Infused with the warm spices of fall and topped with a sweet, spiced glaze, these scones capture the essence of pumpkin season in every bite. The tender, slightly crumbly texture combined with the rich, aromatic flavors makes them an irresistible indulgence.
Why you will love this recipe: You will absolutely adore these Pumpkin Scones because they bring the authentic taste of a bakery right into your home. Forget those overly sweet, dry, store-bought versions. This recipe delivers a moist, flavorful scone that is surprisingly easy to make. The blend of cinnamon, nutmeg, cloves, and ginger creates a warm, inviting aroma that fills your kitchen as they bake, promising a delicious experience. Plus, the customizable glaze allows you to adjust the sweetness and spice levels to perfectly match your preferences. These scones are not just a recipe; they are an experience, turning an ordinary day into a special occasion with each delectable bite. They’re also incredibly versatile – perfect with a cup of coffee or tea, or as a standout treat for holidays like Thanksgiving and Christmas.
Ingredients:
- 2 cups all-purpose flour
- 1⁄4 cup granulated sugar
- 1 tablespoon baking powder
- 1⁄2 teaspoon salt
- 1⁄2 teaspoon ground cinnamon
- 1⁄2 teaspoon ground nutmeg
- 1⁄4 teaspoon ground cloves
- 1⁄4 teaspoon ground ginger
- 6 tablespoons unsalted butter, chilled and cubed
- 1⁄2 cup canned pumpkin puree
- 3 tablespoons heavy cream
- 1 large egg
- 1 teaspoon vanilla extract
For the glaze:
- 1 cup powdered sugar
- 1 to 2 tablespoons milk
- 1⁄4 teaspoon ground cinnamon
- 1⁄8 teaspoon ground nutmeg
Preparation:
Step 1: Preheat and Prep
Begin by preheating your oven to 400°F (200°C). This ensures the scones will rise properly and bake evenly. While the oven is heating, line a baking sheet with parchment paper. Parchment paper prevents the scones from sticking to the baking sheet and makes cleanup a breeze. If you don’t have parchment paper, you can lightly grease the baking sheet with butter or cooking spray.
Step 2: Combine Dry Ingredients
In a large mixing bowl, whisk together the all-purpose flour, granulated sugar, baking powder, salt, ground cinnamon, ground nutmeg, ground cloves, and ground ginger. Whisking ensures that all the ingredients are evenly distributed, which is crucial for the scones to rise uniformly and have a consistent flavor throughout. The baking powder is essential for creating a light and airy texture, while the spices add warmth and depth.
Step 3: Cut in the Butter
Add the chilled and cubed unsalted butter to the dry ingredients. Using a pastry cutter or your fingertips, cut the butter into the flour mixture until it resembles coarse crumbs. The key here is to work quickly and keep the butter cold. Cold butter creates pockets of fat within the dough, which melt during baking, resulting in a flaky, tender scone. If the butter gets too warm, the scones will be dense and heavy. A pastry cutter is ideal for this step, but if you don’t have one, your fingertips can work just as well – just be sure to use a light touch and avoid overworking the dough.
Step 4: Mix Wet Ingredients
In a separate bowl, mix together the canned pumpkin puree, heavy cream, large egg, and vanilla extract until well combined. This ensures that the wet ingredients are evenly mixed and ready to be incorporated into the dry ingredients. The pumpkin puree adds moisture and a subtle pumpkin flavor, while the heavy cream enriches the dough and adds tenderness. The egg acts as a binder, holding the ingredients together, and the vanilla extract enhances the overall flavor profile.
Step 5: Combine Wet and Dry Ingredients
Pour the wet ingredients into the dry ingredients and stir until a dough forms. Be careful not to overmix. Overmixing develops the gluten in the flour, which can result in tough scones. Stir just until the ingredients are combined and the dough comes together. It’s okay if the dough is a little shaggy – it will come together as you knead it.
Step 6: Shape the Dough
Turn the dough out onto a lightly floured surface. Lightly flouring the surface prevents the dough from sticking and makes it easier to handle. Knead the dough gently to bring it together, then shape it into a disc about 1 inch thick. The kneading process should be minimal – just enough to form a cohesive dough. A 1-inch thickness ensures that the scones will bake evenly and have a good height.
Step 7: Cut and Arrange Scones
Cut the disc into 8 wedges and transfer them to the prepared baking sheet, spacing them slightly apart. A pizza cutter or a sharp knife works well for cutting the scones. Spacing the scones apart on the baking sheet allows for proper air circulation, which helps them bake evenly.
Step 8: Bake
Bake for 15 to 18 minutes or until the scones are golden brown. The baking time may vary depending on your oven, so keep an eye on the scones and check them for doneness. They should be lightly browned on top and firm to the touch. A toothpick inserted into the center should come out clean.
Step 9: Cool
Remove the scones from the oven and let them cool on a wire rack. Cooling on a wire rack prevents the scones from becoming soggy on the bottom.
Step 10: Prepare the Glaze
While the scones are cooling, make the glaze. In a small bowl, whisk together the powdered sugar, milk (starting with 1 tablespoon and adding more to reach desired consistency), ground cinnamon, and ground nutmeg until smooth. Start with a small amount of milk and add more gradually until you reach the desired consistency. The glaze should be thick enough to cling to the scones but thin enough to drizzle easily.
Step 11: Glaze the Scones
Drizzle the glaze over the cooled scones and allow it to set before serving. The glaze will harden slightly as it sets, adding a touch of sweetness and spice to the scones.
COOKING Rating: Easy to Medium
Serving Suggestions:
These Bakery-Style Pumpkin Scones are incredibly versatile and can be enjoyed in a variety of ways. Serve them warm with a dollop of whipped cream or a scoop of vanilla ice cream for a decadent dessert. They also pair perfectly with a cup of hot coffee or tea for a cozy breakfast or afternoon snack. For a festive brunch, serve them alongside other autumnal treats like pumpkin muffins, apple cider donuts, and cranberry scones. These scones also make a thoughtful homemade gift for friends and family during the fall season.
Tips:
- Use cold butter: Cold butter is crucial for creating flaky, tender scones. If the butter gets too warm, the scones will be dense and heavy.
- Don’t overmix the dough: Overmixing develops the gluten in the flour, which can result in tough scones. Stir just until the ingredients are combined.
- Adjust the spices: Feel free to adjust the spices to your liking. If you prefer a more intense pumpkin flavor, you can add a pinch of pumpkin pie spice.
- Add mix-ins: Get creative with mix-ins. Chocolate chips, dried cranberries, chopped nuts, or a sprinkle of pepitas would all be delicious additions to these scones.
- Freeze for later: These scones can be frozen for later enjoyment. Wrap them individually in plastic wrap and store them in a freezer-safe bag. To reheat, bake them in a preheated oven at 350°F (175°C) for 10-15 minutes.
Prep Time: 20 minutes
Cook Time: 15-18 minutes
Total Time: 35-38 minutes
Nutritional Information: (per scone, approximate)
Calories: 350 kcal Protein: 5g Sodium: 250mg
Conclusion:
These Bakery-Style Pumpkin Scones are a testament to the simple joys of baking. With their warm spices, tender crumb, and sweet glaze, they offer a delightful taste of fall in every bite. Whether you’re a seasoned baker or a novice in the kitchen, this recipe is easy to follow and yields consistently delicious results. So, gather your ingredients, preheat your oven, and get ready to indulge in the irresistible flavors of pumpkin season. These scones are more than just a treat; they are a celebration of cozy moments, shared laughter, and the simple pleasure of homemade goodness. Enjoy!
5 Questions and Answers About This Recipe:
Question 1: Can I use self-rising flour instead of all-purpose flour and baking powder?
Answer: While you can substitute self-rising flour, it’s not recommended for this particular recipe. Self-rising flour already contains baking powder and salt, so you would need to adjust the recipe accordingly. Using self-rising flour as a direct substitute might result in scones that are too salty or rise too much, affecting the texture. For the best results, stick to all-purpose flour and baking powder as outlined in the recipe.
Question 2: Can I make these scones ahead of time?
Answer: Absolutely! You can prepare the dough ahead of time and store it in the refrigerator for up to 24 hours. Wrap the dough tightly in plastic wrap to prevent it from drying out. When you’re ready to bake, simply cut the dough into wedges and bake as directed. You can also bake the scones ahead of time and freeze them for later enjoyment. Let them cool completely, then wrap them individually in plastic wrap and store them in a freezer-safe bag.
Question 3: What if I don’t have heavy cream? Can I use milk instead?
Answer: While heavy cream adds richness and tenderness to the scones, you can substitute it with milk if needed. However, keep in mind that the scones may be slightly less tender and have a slightly different texture. For best results, use whole milk or a combination of milk and a tablespoon of melted butter to mimic the fat content of heavy cream.
Question 4: Can I add chocolate chips to these scones?
Answer: Absolutely! Chocolate chips would be a delicious addition to these pumpkin scones. Add about 1/2 cup of chocolate chips to the dough after you’ve combined the wet and dry ingredients. Gently fold them in until they’re evenly distributed. You can use any type of chocolate chips you like, such as semi-sweet, milk chocolate, or dark chocolate.
Question 5: How do I prevent the scones from spreading too much while baking?
Answer: To prevent the scones from spreading too much while baking, make sure to keep the butter cold and avoid overmixing the dough. Cold butter creates pockets of fat that melt during baking, creating a flaky texture. Overmixing develops the gluten in the flour, which can cause the scones to spread. Also, make sure your oven is preheated to the correct temperature before baking the scones.