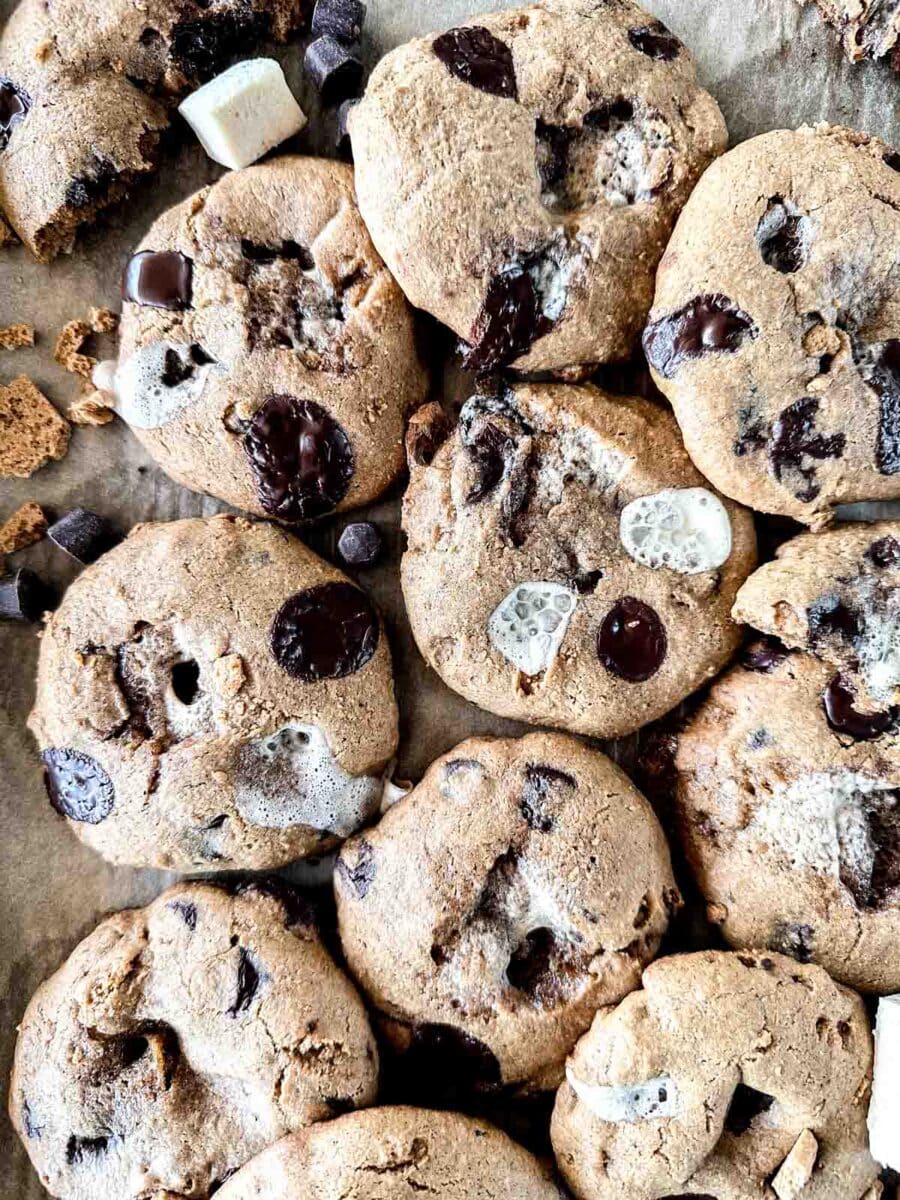
Imagine the quintessential campfire treat, the s’more, transformed into a delectable, chewy cookie. That’s precisely what these Brown Butter S’mores Cookies offer: a delightful fusion of rich, nutty brown butter, melty chocolate, crunchy graham crackers, and gooey marshmallows, all baked into one unforgettable bite. This recipe takes the classic s’more experience to a whole new level, delivering a sophisticated yet comforting dessert that will captivate your taste buds. Forget the sticky fingers and smoky aroma of the campfire – this is s’mores, elevated.
Why You Will Love This Recipe
These cookies are more than just a sweet treat; they’re an experience. The brown butter adds a depth of flavor that transcends ordinary cookies, lending a warm, nutty complexity that perfectly complements the sweetness of the marshmallows and chocolate. The combination of gluten-free and almond flour creates a tender crumb, while the graham cracker pieces provide a delightful textural contrast. Moreover, these cookies are incredibly easy to make, requiring minimal effort for maximum impact. Whether you’re baking for a special occasion or simply craving a delicious homemade dessert, these Brown Butter S’mores Cookies are guaranteed to be a hit. They’re a nostalgic indulgence with a gourmet twist, perfect for satisfying your sweet tooth and impressing your friends and family. Each bite is a symphony of flavors and textures that will transport you back to carefree summer nights around the campfire. This recipe is also adaptable, allowing you to customize the ingredients to suit your dietary needs and preferences. It’s a fun and creative way to enjoy a classic treat in a new and exciting format.
Ingredients:
- 12 tablespoons (170g) Unsalted Butter
- 1 cup (120g) Gluten-Free All-Purpose Flour
- ¼ cup (28g) Almond Flour
- ½ teaspoon Baking Powder
- ¼ teaspoon Baking Soda
- ¼ teaspoon Sea Salt
- ½ teaspoon Ground Cinnamon
- 2 large Eggs
- ½ cup (100g) Coconut Sugar
- ¼ cup (50g) Date Sugar
- 1 teaspoon Vanilla Extract
- 1 cup (170g) Chocolate Chips (such as Hu Gems)
- ¾ cup (60g) Gluten-Free Graham Crackers (such as Simple Mills), coarsely crushed
- 1 cup (80g) Mini Marshmallows (preferably without high-fructose corn syrup)
Preparation:
Step 1: Brown the Butter. In a medium saucepan over medium heat, melt the butter. Stir the butter frequently to prevent burning. Continue to cook until the butter starts to brown and develops a nutty aroma. This process typically takes about 5-7 minutes. Remove the saucepan from the heat and allow the brown butter to cool completely. Cooling is crucial, as warm butter can affect the texture of the cookies.
Step 2: Combine Dry Ingredients. In a large mixing bowl, sift together the gluten-free flour, almond flour, baking powder, baking soda, sea salt, and cinnamon. Sifting ensures that there are no lumps in the dry ingredients and that they are evenly distributed throughout the dough. The cinnamon adds a warm spice note that complements the other flavors.
Step 3: Mix Wet Ingredients. In the bowl of a stand mixer fitted with the paddle attachment, add the eggs, coconut sugar, date sugar, vanilla extract, and cooled brown butter. Mix on low to medium speed until the ingredients are thoroughly combined and the mixture is smooth. Be sure to scrape down the sides of the bowl occasionally to ensure that everything is incorporated.
Step 4: Combine Wet and Dry Ingredients. Slowly add the dry ingredients to the wet ingredients, mixing on low speed until just combined. At this point, you should still see some flour streaks in the dough. This prevents overmixing, which can result in tough cookies. Add ¾ cup of the chocolate chips and the coarsely crushed graham crackers, and mix again until everything is evenly distributed throughout the dough.
Step 5: Chill the Dough. Cover the bowl with plastic wrap and place it in the refrigerator to chill for at least 1 hour. Chilling the dough allows the gluten-free flour to hydrate properly, resulting in a chewier cookie. It also helps to prevent the cookies from spreading too much during baking.
Step 6: Preheat and Prepare. Once the cookie dough has chilled, preheat your oven to 350°F (175°C). Line a baking sheet with parchment paper. Parchment paper prevents the cookies from sticking to the baking sheet and makes for easy cleanup.
Step 7: Scoop and Shape. Use a 2-inch ice cream scoop to scoop the chilled dough into balls. The dough should make approximately 12 cookies. Place a marshmallow in the center of each dough ball. Carefully fold the dough around the marshmallow to completely cover it, ensuring that it does not ooze out during baking. Shape the dough into a ball and gently press down to flatten slightly.
Step 8: Bake the Cookies. Place the prepared cookies on the lined baking sheet, leaving some space between each cookie to allow for spreading. Bake for 10-12 minutes, or until the edges start to turn golden brown. The centers of the cookies should still be slightly soft.
Step 9: Add Toppings. Remove the baking sheet from the oven and immediately add a few more chocolate chips and small pieces of marshmallow to the top of each cookie. The residual heat will melt the chocolate chips and marshmallows, creating a beautiful and tempting presentation.
Step 10: Cool and Serve. Allow the cookies to cool on the baking sheet for 10 minutes before transferring them to a wire cooling rack to cool completely. This allows the cookies to set up properly and prevents them from breaking.
COOKING Rating:
- Ease of Preparation: Easy
- Flavor Complexity: Medium
- Overall Impression: Delicious and Memorable
Serving Suggestions:
These Brown Butter S’mores Cookies are perfect on their own as a sweet treat. However, they can also be paired with a variety of complementary items:
- Vanilla Ice Cream: Serve warm cookies with a scoop of vanilla ice cream for a decadent dessert.
- Hot Chocolate: Enjoy these cookies with a warm cup of hot chocolate on a chilly evening.
- Coffee or Tea: Pair them with your favorite coffee or tea for a delightful afternoon snack.
- Milk: These cookies are classic served with a cold glass of milk.
Tips:
- Browning the Butter: Keep a close eye on the butter while it’s browning to prevent it from burning. The butter is ready when it has a nutty aroma and the milk solids have turned golden brown.
- Chilling the Dough: Don’t skip the chilling step! Chilling the dough is essential for preventing the cookies from spreading too much during baking.
- Marshmallow Placement: Ensure that the marshmallow is completely enclosed in the dough to prevent it from oozing out during baking.
- Gluten-Free Flour: If you don’t have gluten-free flour on hand, you can substitute it with regular all-purpose flour. However, the texture of the cookies may be slightly different.
- Storage: Store the cookies in an airtight container at room temperature for up to 3 days.
Prep Time: 20 minutes
Cook Time: 12 minutes
Total Time: 1 hour 32 minutes (includes chilling time)
Nutritional Information: (Approximate values per cookie)
- Calories: 250
- Protein: 3g
- Sodium: 150mg
Conclusion
These Brown Butter S’mores Cookies are a delightful twist on a classic campfire treat. The rich, nutty flavor of the brown butter, combined with the melty chocolate, gooey marshmallows, and crunchy graham crackers, creates a truly unforgettable cookie experience. Whether you’re baking for a special occasion or simply craving a delicious homemade dessert, these cookies are guaranteed to impress. They’re easy to make, customizable to your dietary needs and preferences, and perfect for satisfying your sweet tooth. So, gather your ingredients, preheat your oven, and get ready to enjoy a batch of these irresistible Brown Butter S’mores Cookies. Your taste buds will thank you!
Questions and Answers:
- Can I use regular all-purpose flour instead of gluten-free flour?
- Yes, you can substitute regular all-purpose flour for gluten-free flour. However, the texture of the cookies may be slightly different. Gluten-free flour tends to produce a softer, chewier cookie, while all-purpose flour may result in a slightly denser cookie.
- Why is it important to chill the dough before baking?
- Chilling the dough is essential for preventing the cookies from spreading too much during baking. It allows the gluten-free flour to hydrate properly, resulting in a chewier cookie, and helps the cookies maintain their shape while baking.
- Can I use different types of chocolate chips in this recipe?
- Absolutely! You can use any type of chocolate chips you prefer, such as milk chocolate, dark chocolate, or even white chocolate chips. Experiment with different combinations to find your favorite flavor profile.
- How do I store these cookies to keep them fresh?
- To keep these cookies fresh, store them in an airtight container at room temperature for up to 3 days. Avoid storing them in the refrigerator, as this can dry them out.
- What if I don’t have date sugar?
- If you don’t have date sugar, you can substitute it with an equal amount of brown sugar or granulated sugar. Keep in mind that the flavor may be slightly different.