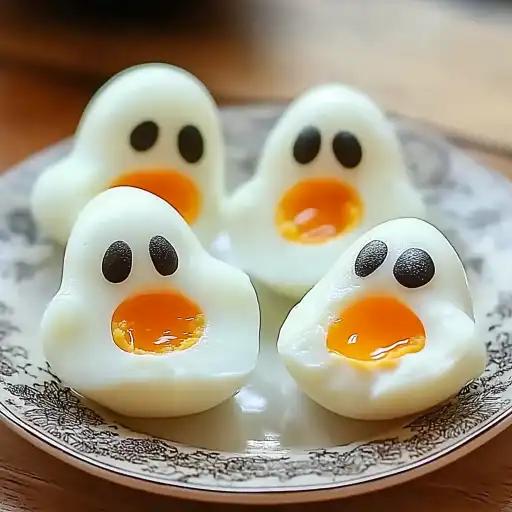
These adorable Ghost Hard-Boiled Eggs are the perfect way to add a spooky and healthy twist to your Halloween breakfast or snack. Simple to make and fun to decorate, they’re a guaranteed hit with kids of all ages. These aren’t just a novelty item; they’re a delicious and protein-packed way to start the day, disguised as playful little ghosts.
Why you will love this recipe:
- Simple and quick: Requires minimal ingredients and very little active cooking time.
- Healthy and nutritious: A great source of protein, essential for growing bodies.
- Fun and engaging: Kids will love helping to decorate their own ghost eggs.
- Versatile: Perfect for breakfast, lunchboxes, Halloween parties, or a spooky snack.
- Customizable: Easily adaptable to different dietary needs and preferences.
Ingredients:
- 6 large eggs
- Water (for boiling)
- ½ teaspoon salt (optional, for easier peeling)
- Black olives, sesame seeds, or edible candy eyes for decoration
- Optional for Serving:
- Sliced vegetables (carrots, cucumbers, celery sticks)
- Whole-grain toast or mini bagels
- Ketchup or mustard for ghost faces
Preparation:
Step 1: Boiling the Eggs: Gently place the eggs in a medium saucepan. Cover them completely with cold water, ensuring that the water level is about an inch above the eggs. Add a pinch of salt (about ½ teaspoon) to the water. The salt helps prevent the eggs from cracking and also makes them easier to peel later.
Step 2: Bringing to a Simmer: Place the saucepan over medium-high heat and bring the water to a gentle boil. Once the water starts to bubble, reduce the heat to low. It’s important to avoid a rolling boil as this can cause the eggs to crack against each other.
Step 3: Simmering the Eggs: Let the eggs simmer gently for 10-12 minutes. The exact cooking time depends on the size of the eggs and your preferred yolk consistency. For a firm yolk, aim for 12 minutes. For a slightly softer yolk, 10 minutes should suffice. Set a timer to ensure accurate cooking.
Step 4: Cooling the Eggs: Once the timer goes off, immediately remove the saucepan from the heat. Carefully pour out the hot water and then transfer the eggs to a bowl filled with ice water. Let the eggs sit in the ice bath for at least 5 minutes to stop the cooking process. This helps prevent the yolks from turning green and makes the eggs easier to peel.
Step 5: Peeling the Eggs: After the eggs have cooled in the ice water, gently tap each egg all over on a hard surface to crack the shell. Start peeling the egg under running water. The water helps to loosen the shell from the egg white. Be patient and peel carefully to avoid tearing the egg. Once peeled, pat the eggs dry with a paper towel.
Step 6: Decorating the Ghosts: Now comes the fun part! To create the ghost faces, you can use a variety of decorations.
- Eyes: Poke small holes where you want the eyes to be. Insert small pieces of black olive, sesame seeds, or edible candy eyes into the holes. You can also use a toothpick to apply a tiny dab of honey or cream cheese to the back of the candy eyes to help them stick.
- Mouths: For a simple mouth, you can use a toothpick dipped in ketchup or mustard to draw a small, spooky grin. Alternatively, you can cut small pieces of black olive or red pepper to create different mouth shapes.
- Other Decorations: Get creative! You can use food coloring markers to draw designs on the eggs, or use small pieces of cooked carrot or cucumber to add other ghostly features.
Step 7: Serving: Arrange the decorated ghost eggs on a platter. Serve them with sliced vegetables like carrots, cucumbers, and celery sticks for a healthy and colorful snack. You can also serve them with whole-grain toast or mini bagels for a more substantial breakfast. Cut the toast into fun shapes using cookie cutters for an extra festive touch.
COOKING Rating: Easy
Serving Suggestions:
- Serve as a Halloween breakfast or snack.
- Pack in lunchboxes for a spooky surprise.
- Bring to Halloween parties as a fun appetizer.
- Serve alongside other Halloween-themed treats.
- Pair with sliced vegetables, toast, or bagels for a complete meal.
Tips:
- To make peeling easier, add a teaspoon of vinegar to the boiling water.
- Do not overcook the eggs, as this can cause a green ring to form around the yolk.
- If you’re using edible candy eyes, make sure they are small enough to stick easily to the egg.
- Get the kids involved in the decorating process for a fun family activity.
- Store leftover ghost eggs in the refrigerator for up to 2 days.
Prep Time: 5 minutes Cook Time: 12 minutes Total Time: 17 minutes
Nutritional Information: (per egg, without decorations)
Calories: Approximately 78 Protein: 6 grams Sodium: 62mg (this can vary widely depending on salt added during cooking or used in decorating)
Conclusion
These Ghost Hard-Boiled Eggs are a delightful way to celebrate Halloween with a healthy and fun twist. Not only are they incredibly easy to make, but they also offer a nutritious and protein-packed snack or breakfast option for kids (and adults!) during the spooky season. The process of decorating the eggs can be a wonderfully engaging activity for children, allowing them to express their creativity and enjoy the fruits of their labor – or rather, the eggs of their labor. The versatility of this recipe allows for endless customization, ensuring that everyone can find a way to enjoy these ghostly delights. Whether you’re serving them at a Halloween party, packing them in lunchboxes, or simply looking for a festive way to start the day, these Ghost Hard-Boiled Eggs are sure to be a crowd-pleaser. So gather your ingredients, unleash your inner artist, and prepare to be amazed by how much fun and flavor you can pack into a simple hard-boiled egg. Happy haunting!
Questions and Answers:
Q1: Can I use brown eggs instead of white eggs? A: Absolutely! Brown eggs will work just as well as white eggs for this recipe. The only difference is the color of the shell, which won’t affect the taste or the decoration process. In fact, the slightly darker background of brown eggs might even make the ghost faces stand out more!
Q2: My eggs always crack when I boil them. What am I doing wrong? A: There are a few things you can try to prevent your eggs from cracking while boiling. First, make sure the eggs are at room temperature before you put them in the pot. Bringing cold eggs directly from the refrigerator into boiling water can cause them to crack due to the sudden temperature change. Second, gently lower the eggs into the water instead of dropping them in. Finally, avoid boiling the water too vigorously. A gentle simmer is all you need. Adding a pinch of salt or a teaspoon of vinegar to the water can also help prevent cracking.
Q3: What if I don’t have black olives or sesame seeds for the eyes? A: No problem! You can get creative with the decorations. Edible candy eyes are a great alternative, and you can find them at most grocery stores or baking supply stores. You can also use small pieces of other vegetables, like red pepper or cucumber, or even dots of ketchup or mustard. Let your imagination run wild!
Q4: How long can I store the decorated ghost eggs in the refrigerator? A: You can store the decorated ghost eggs in the refrigerator for up to 2 days. Make sure to store them in an airtight container to prevent them from drying out. However, keep in mind that the decorations, especially if you’re using ketchup or mustard, may start to run after a while.
Q5: Can I make these ghost eggs ahead of time for a party? A: Yes, you can definitely make these ghost eggs ahead of time. Boil and peel the eggs a day or two in advance, and store them in the refrigerator. However, it’s best to decorate them closer to the time you’ll be serving them to prevent the decorations from smudging or drying out.