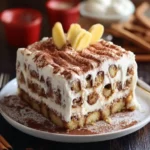
This no-bake cheesecake recipe is a dreamy dessert that requires no oven time! It’s perfect for those warm summer months or anytime you want a delicious treat without the fuss of baking. The creamy, tangy filling sits atop a buttery biscuit crust, creating a symphony of textures and flavors that will leave you wanting more.
Why You’ll Love This Recipe
- Incredibly Easy: With no baking required, this recipe is foolproof and perfect for beginner bakers.
- Make-Ahead Friendly: The cheesecake needs to chill for at least 6 hours, making it ideal for preparing in advance.
- Customizable: Easily adapt the crust and toppings to suit your preferences. Use different cookies, add chocolate shavings, or top with your favorite fruit.
- Rich and Creamy: The combination of cream cheese and whipped cream creates a luxuriously smooth and decadent texture.
- Crowd-Pleaser: This cheesecake is always a hit at parties, gatherings, or as a special treat for yourself.
Ingredients
Biscuit Crust:
- 200g/7 oz digestive biscuits (13 pieces, ~1 2/3 cups crumbs), or other plain biscuits/cookies
- 90g (6 tbsp) unsalted butter, melted
- 1/2 tsp cinnamon powder (optional)
- 1 tbsp brown sugar
- Pinch of salt
No-Bake Cheesecake Filling:
- 2 1/4 tsp (9 g) gelatin powder, unflavored
- 2 tbsp cold tap water
- 1 cup thickened or heavy cream, or any whipping cream, FRIDGE COLD
- 500g/ 16 oz cream cheese block (not tub), well softened at room temperature
- 3/4 cup caster sugar / superfine sugar
- 1 tsp vanilla extract
- 1 tbsp lemon juice (optional)
Optional Decorations:
- 6 strawberries, halved (plus extra for serving)
- Whipped cream (half batch for decorating, or full batch for extra to serving on side)
Preparation
Step 1: Prepare the Crust
Begin by lining your springform pan. Invert the base of a 20cm/8″ springform pan. Lightly grease with butter. Place a square piece of parchment/baking paper on the base, then clip it into the springform pan, allowing the excess paper to stick out. Butter and line the side of the pan. Now, for the crust! In a food processor, pulse the digestive biscuits until they form fine crumbs. Alternatively, place the biscuits in a zip-lock bag and crush them with a rolling pin. In a mixing bowl, combine the biscuit crumbs with melted butter, cinnamon powder (if using), brown sugar, and a pinch of salt. Mix well until the mixture resembles wet sand.
Step 2: Press the Crust into the Pan
Pour the crumb mixture into the prepared springform pan. Use a spatula to spread the mixture evenly over the base and up the sides of the pan. Press firmly using the back of a spoon or a measuring cup to create a compact and even crust. Ensure the wall of the crust is about ~9mm (0.35″) from the top of the rim. Refrigerate the crust for at least 30 minutes while you prepare the filling.
Step 3: Bloom and Melt the Gelatin
In a small bowl, sprinkle the gelatin powder over the cold water. Let it sit for 5-10 minutes to bloom, or until it becomes firm like rubber. Microwave the bloomed gelatin for 15 seconds on high or until it melts completely. Be careful not to boil it. Let it cool for about 5 minutes while you prepare the cheesecake filling. Ensure the gelatin remains liquid when you add it to the filling.
Step 4: Whip the Cream
In a large mixing bowl, pour the cold heavy cream. Use an electric mixer to whip the cream on high speed for about 2 minutes, until stiff peaks form. This means the cream holds its shape when the beaters are lifted. Set aside.
Step 5: Prepare the Cheesecake Filling
In a separate large mixing bowl, combine the softened cream cheese and caster sugar. Beat with an electric mixer on high speed for about 1 minute, until the mixture is smooth and creamy. Add the vanilla extract, lemon juice (if using), and the cooled, melted gelatin. Beat again for about 10 seconds to ensure everything is well combined. Be careful not to overbeat, as this can introduce too much air into the mixture.
Step 6: Combine the Filling Ingredients
Gently fold about 1/4 of the whipped cream into the cream cheese mixture. Use a rubber spatula or a large spoon to gently combine the ingredients, being careful not to deflate the cream. Once incorporated, fold in the remaining whipped cream until the mixture is smooth and uniform.
Step 7: Assemble and Chill the Cheesecake
Pour the cheesecake filling into the prepared biscuit crust. Smooth the surface with a spatula. Cover the springform pan with plastic wrap and refrigerate for at least 6 hours, or preferably overnight, to allow the cheesecake to set completely.
Step 8: Decorate and Serve
Once the cheesecake is set, carefully remove it from the springform pan. Run a thin knife along the edges of the pan to loosen the cheesecake if needed. Transfer the cheesecake to a serving platter. Decorate the top with whipped cream and halved strawberries, or any other toppings of your choice. Slice and serve chilled.
COOKING Rating:
Easy
Serving Suggestions
- Serve chilled as a dessert.
- Pair with fresh berries, chocolate shavings, or a fruit compote.
- Enjoy with a cup of coffee or tea.
- Serve at parties, potlucks, or special occasions.
Tips
- Ensure the cream cheese is fully softened at room temperature to avoid lumps in the filling.
- Use cold heavy cream for best whipping results.
- Do not overbeat the cream cheese mixture, as this can introduce too much air.
- Chill the cheesecake for at least 6 hours for proper setting.
- For a richer flavor, use full-fat cream cheese and heavy cream.
- If you don’t have digestive biscuits, graham crackers or other plain cookies work well too.
- The lemon juice balances the sweetness and adds a subtle tang, but it can be omitted if you prefer a sweeter cheesecake.
Prep Time:
25 minutes
Cook Time:
0 minutes
Total Time:
25 minutes (plus 6 hours chilling time)
Nutritional Information:
(Note: Nutritional information is approximate and may vary based on specific ingredients used.)
Calories:
Approximately 450-550 per slice
Protein:
Approximately 7-9g per slice
Sodium:
Approximately 200-250mg per slice
Conclusion
This No-Bake Classic Cheesecake is a delightful dessert that’s both easy to make and incredibly satisfying. Its creamy texture, rich flavor, and customizable toppings make it a perfect choice for any occasion. Whether you’re a seasoned baker or just starting out, this recipe is sure to impress. Enjoy a slice of effortless decadence!
Questions and Answers
Q1: Can I use a different type of cookie for the crust?
A: Absolutely! While digestive biscuits are a classic choice, you can easily substitute them with graham crackers, Oreo cookies (without the filling), or any other plain cookies you enjoy. Just make sure to adjust the amount of butter accordingly to achieve the right consistency.
Q2: Can I make this cheesecake ahead of time?
A: Yes, definitely! In fact, this cheesecake is perfect for making ahead of time. It needs to chill for at least 6 hours, but it can be made up to 2-3 days in advance. Just make sure to store it covered in the refrigerator.
Q3: My cream cheese is lumpy, what should I do?
A: Lumpy cream cheese usually indicates that it wasn’t softened enough. If you encounter this, try beating the cream cheese with an electric mixer for a longer period until it becomes smooth. You can also try microwaving it for a few seconds (in very short bursts) to soften it further, but be careful not to melt it.
Q4: Can I freeze this cheesecake?
A: While you can freeze this cheesecake, the texture might change slightly. Cream cheese-based desserts can sometimes become a bit grainy after freezing. If you do freeze it, wrap it tightly in plastic wrap and then in foil, and thaw it in the refrigerator overnight before serving.
Q5: Can I add other flavorings to the filling?
A: Absolutely! Feel free to experiment with different flavorings in the cheesecake filling. You could add a tablespoon or two of cocoa powder for a chocolate cheesecake, a swirl of peanut butter for a peanut butter cheesecake, or even some citrus zest for a lemon or orange cheesecake. Let your creativity shine!