Description of this recipe
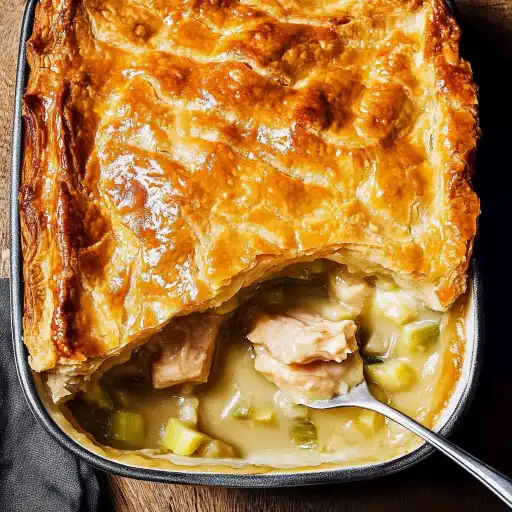
This Chicken and Leek Pie is the epitome of comfort food, a rich and savory dish featuring tender chicken and sweet leeks enveloped in a creamy sauce, all encased in a flaky, golden puff pastry crust. It’s a hearty and satisfying meal perfect for a chilly evening or any occasion that calls for a little indulgence.
Why you will love this recipe
This recipe is a guaranteed crowd-pleaser! The combination of flavors is simply divine, with the savory chicken and bacon perfectly complemented by the mild sweetness of the leeks and the richness of the creamy sauce. The buttery puff pastry adds a delightful textural contrast, making each bite a symphony of flavors and textures. Plus, it’s surprisingly easy to make, and you can even prepare the filling in advance, making it a convenient option for busy weeknights or weekend gatherings.
Ingredients:
For the Filling:
- 50g (3 1/2 tbsp) unsalted butter, divided
- 750g (1.5lb) chicken thighs, skinless, boneless, cut into 1.8 cm (3/4″) bite-size pieces
- 1/4 tsp black pepper
- 1/4 tsp cooking salt (kosher salt)
- 80g (3 oz) streaky bacon, chopped into 1cm (0.4″) squares
- 2 leeks
- 2 celery stems, sliced 4 mm (0.2″) thick (cut thick end in half lengthways first)
- 2 garlic cloves, finely minced
- 1/3 cup chardonnay or other dry white wine
- 1/4 cup flour (plain / all-purpose)
- 1 tbsp Dijon mustard
- 2 thyme sprigs (or 1/2 tsp dried thyme)
- 2 bay leaves (preferably fresh, else dried)
- 1 cup chicken stock / broth, low sodium
- 1 cup thickened / heavy cream (or any full-fat cream, or sub milk for lower fat)
- 1/2 tsp cooking salt / kosher salt
- 1/4 tsp black pepper
For the Pie:
- 2 x 20cm (8″) frozen butter puff pastry sheets, or single sheet large enough to cover baking dish, 360g (12 oz)
- 1 egg, yolk and whites separated, lightly whisked
Preparation:
Step 1: Prepare the Leeks:
Start by thoroughly cleaning the leeks. Trim off the reedy dark green ends and the root. Cut the leeks in half lengthwise. Remove the outer 5 to 6 layers (keep them together), lay them flat, cut in half lengthwise, and then into 1.8cm (3/4″) squares. Cut the inner core into 2cm (0.8″) pieces. Separating the layers ensures even cooking and prevents any dirt from remaining trapped inside.
Step 2: Sear the Chicken:
Melt half of the butter in a large pan over high heat. Add the chicken, salt, and pepper. Cook until the surface of the chicken changes from pink to white (the inside will still be raw). Remove the chicken from the pan using a slotted spoon and place it in a bowl. Leave the residual butter and chicken juices in the pan, as they will add flavor to the filling.
Step 3: Sauté the Aromatics:
In the same pan, cook the bacon for 1 minute. Add the leek, celery, and garlic. Cook for 5 minutes, or until the celery is softened. Be careful not to let the leek brown; lower the heat if needed. Sautéing the vegetables softens them and releases their flavors, creating a fragrant base for the pie filling.
Step 4: Deglaze the Pan:
Add the white wine to the pan and simmer rapidly over high heat, stirring, until most of the wine has evaporated. This process, called deglazing, loosens any flavorful bits stuck to the bottom of the pan and adds depth of flavor to the sauce.
Step 5: Create the Roux:
Lower the heat to medium. Add the remaining butter. Once it melts, sprinkle the flour across the surface (avoid dumping it in one place) and stir for 1 minute. Cooking the flour creates a roux, which will help to thicken the sauce.
Step 6: Make the Creamy Sauce:
While stirring, slowly pour the chicken stock into the pan. The mixture will thicken into a thick sauce once combined. Then add the Dijon mustard, cream, thyme, bay leaves, salt, and pepper. Stir to combine, then add the chicken (including all the juices accumulated in the bowl). The mustard adds a subtle tang that balances the richness of the cream.
Step 7: Simmer the Filling:
Increase the heat, stir to combine. Once the mixture comes to a simmer, reduce the heat to medium-high. Simmer for 5 minutes, stirring regularly, or until the sauce reaches the desired thickness. Remember that the sauce thickness now will be the same as the thickness in the baked pie, so adjust accordingly.
Step 8: Cool the Filling:
Remove the pan from the stove and cool the filling for 1 hour. You can also store it in the refrigerator for 3-4 days. Cooling the filling prevents the pastry from becoming soggy during baking.
Step 9: Assemble the Pie:
Preheat the oven to 200°C/375°F (180°C fan-forced). Use a 1.5-liter (1.5-quart) baking pan or 4 to 5 individual ramekins (approximately 350ml / 12 oz each).
Step 10: Prepare the Puff Pastry:
If using two puff pastry sheets, semi-thaw them (this makes them easier to handle). Brush the edge of one sheet with egg white, then overlap it by 0.5cm (0.2″) with the other sheet to connect them. Use the back of a spoon to “smear” the pastry to hide the seam and firmly connect the sheets.
Step 11: Cut the Pie Lid:
Cut out the pie lid, using the dish or ramekin as a cutting guide.
Step 12: Add Optional Strips for Puffy Edges:
Cut strips from the residual pastry to line the rim of the dish (if your dish has a thick rim, like mine). Place the strips on the rim of the dish. These strips will create extra-puffy edges.
Step 13: Fill the Pie:
Fill the pie dish or ramekins with the cooled filling and smooth the surface. Brush the pastry strips on the rim with egg white (if using; if not, skip this step).
Step 14: Cover with Puff Pastry:
Cover the dish or ramekins with the puff pastry lid.
Step 15: Glaze and Bake:
Brush the lid with egg yolk. Cut a small X in the middle of the lid to allow steam to escape during baking.
Bake for 45 minutes, or until the surface is a deep golden brown.
Step 16: Rest and Serve:
Let the pie rest for 5 minutes before serving. This allows the filling to set slightly and prevents it from being too runny.
COOKING Rating:
- Difficulty: Medium
- Deliciousness: Off the Charts!
Serving Suggestions:
- Serve the Chicken and Leek Pie hot, straight from the oven.
- A side of steamed green vegetables, such as broccoli or green beans, complements the richness of the pie.
- A crisp green salad provides a refreshing contrast to the savory filling.
- For an extra touch of indulgence, serve with a dollop of crème fraîche or sour cream.
Tips:
- To save time, you can use pre-cut chicken thighs.
- If you don’t have white wine, you can substitute chicken stock or apple cider.
- For a vegetarian version, replace the chicken with mushrooms or other vegetables.
- To prevent the pastry from sticking to the dish, lightly grease the dish before adding the filling.
- If the pastry starts to brown too quickly during baking, cover it loosely with foil.
- Leftover Chicken and Leek Pie can be stored in the refrigerator for up to 3 days. Reheat in the oven or microwave.
Prep Time: 30 minutes
Cook Time: 45 minutes
Total Time: 1 hour 15 minutes
Nutritional Information:
(Note: Nutritional information is an estimate and may vary depending on specific ingredients and portion sizes.)
- Calories: 600-800 per serving
- Protein: 30-40g per serving
- Sodium: 500-700mg per serving
Conclusion
This Chicken and Leek Pie recipe is more than just a meal; it’s an experience. It’s the kind of dish that evokes feelings of warmth, comfort, and nostalgia. Whether you’re making it for a special occasion or simply to treat yourself, this pie is sure to impress. The combination of tender chicken, sweet leeks, creamy sauce, and flaky puff pastry is simply irresistible. So gather your ingredients, put on your apron, and get ready to create a culinary masterpiece! This is a pie that will be requested time and time again. Enjoy!
Questions and Answers about this recipe
- Can I use different vegetables in the filling? Absolutely! While this recipe specifically calls for leeks and celery, you can easily adapt it to include other vegetables that you enjoy. Mushrooms, carrots, peas, or even spinach would all be delicious additions. Just be sure to adjust the cooking time accordingly to ensure that all the vegetables are cooked through.
- Can I make this pie ahead of time? Yes, you can definitely make this pie ahead of time. In fact, it’s often better to do so, as it allows the flavors to meld together and the filling to cool completely before baking. You can prepare the filling up to 3 days in advance and store it in the refrigerator. When you’re ready to bake, simply assemble the pie and bake as directed.
- Can I freeze this pie? Yes, you can freeze this pie, either before or after baking. If freezing before baking, assemble the pie as directed, but do not brush with egg yolk. Wrap the pie tightly in plastic wrap and then in foil. Freeze for up to 3 months. When ready to bake, thaw the pie in the refrigerator overnight, then brush with egg yolk and bake as directed. If freezing after baking, let the pie cool completely, then wrap tightly in plastic wrap and then in foil. Freeze for up to 2 months. When ready to eat, thaw the pie in the refrigerator overnight, then reheat in a preheated oven at 350°F (175°C) until heated through.
- What can I use instead of puff pastry? While puff pastry is the classic choice for this pie, you can use other types of pastry if you prefer. Shortcrust pastry or even phyllo dough would work well. Just be sure to adjust the baking time accordingly.
- Is it important to cool the filling before assembling the pie? Yes, it is important to cool the filling before assembling the pie. If you add hot filling to the pastry, it will melt the butter in the pastry and make it soggy. Cooling the filling allows it to thicken slightly and prevents the pastry from becoming soggy during baking.