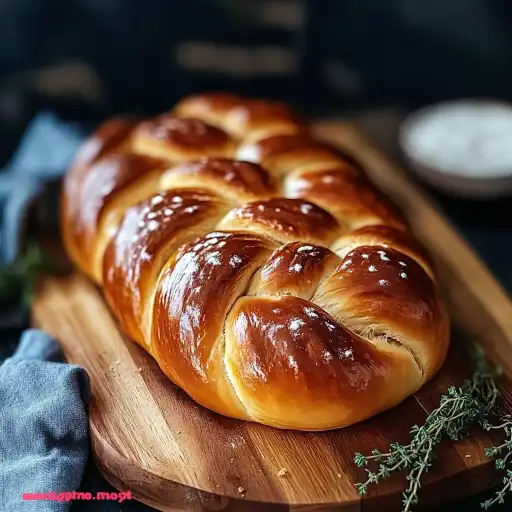
Description of this recipe: Chałka, often spelled challah, is a beautiful, braided bread that holds a special place in Jewish culinary traditions. While traditionally enjoyed on Shabbat and Jewish holidays, this sweet, enriched bread is now celebrated and savored by people of all backgrounds. This Polish Chałka recipe captures the essence of this beloved bread, offering a slightly sweet, tender crumb and a golden-brown crust. It’s a bread that’s as visually stunning as it is delicious, making it perfect for any occasion.
Why you will love this recipe: This Polish Chałka recipe stands out because it balances tradition with accessibility. You’ll adore the deeply satisfying experience of creating a masterpiece from scratch, from the initial mixing to the final braiding and baking. The aroma alone is enough to fill your home with warmth and anticipation. The resulting bread is incredibly versatile – enjoy it plain, toasted, or as the foundation for delectable French toast. Moreover, this recipe provides a forgiving approach, allowing for flexibility in both preparation and baking, ensuring that even novice bakers can achieve impressive results. The overnight chilling process not only enhances the flavor but also makes it incredibly convenient for busy schedules.
Ingredients:
- 1 cup Warm water (105-115°F)
- 2 1/4 teaspoons Active dry yeast
- 5 medium Egg yolks (room temperature)
- 1/3 cup Melted butter (high quality, unsalted preferred)
- 5 tablespoons White sugar
- 2 teaspoons Vanilla sugar (or vanilla extract)
- 3 3/4 cups All-purpose flour (plus extra for dusting)
- 1 teaspoon Salt
- 1 Egg (for egg wash)
- Sesame seeds and poppy seeds (optional, for topping)
Preparation:
Step 1: Activate the Yeast In a large mixing bowl, pour the warm water and sprinkle the active dry yeast over the surface. Let it stand for 5-10 minutes until the yeast is foamy. This step is crucial as it ensures that the yeast is alive and active, which is essential for a good rise. The water temperature should be warm, not hot, to avoid killing the yeast. The foamy appearance indicates that the yeast is feeding on the sugars in the water and producing carbon dioxide, which is what makes the bread rise.
Step 2: Combine Wet Ingredients Add the egg yolks, melted butter, sugar, and vanilla sugar to the yeast mixture. Whisk these ingredients together until well combined. The egg yolks contribute richness and a beautiful golden color to the bread. The melted butter adds moisture and tenderness, while the sugars provide sweetness and help to activate the yeast further. Vanilla sugar adds a subtle, aromatic flavor that enhances the overall taste of the bread.
Step 3: Mix in Dry Ingredients In the same mixing bowl, add the all-purpose flour and salt. Stir with a wooden spoon until a shaggy dough forms. At this stage, the dough will appear rough and uneven. Continue stirring until most of the flour is incorporated, but don’t overmix. The goal is to bring the ingredients together without developing too much gluten at this early stage.
Step 4: Rest and Knead the Dough Let the dough rest for 5 minutes. This allows the flour to absorb the moisture, making it easier to knead. After the rest, continue to stir with the wooden spoon for another 4 minutes. Alternatively, if you have a stand mixer, use the dough hook attachment and mix on low speed.
Step 5: Knead and Form the Dough Turn the dough out onto a lightly floured surface. Knead the dough for 1-2 minutes, adding more flour if it’s too sticky. The dough should be soft, smooth, and elastic, but not sticky. Form the dough into a ball. This process develops the gluten, giving the bread its structure.
Step 6: First Rise (Chill) Place the dough in a lightly oiled large bowl, turning to coat. Cover the bowl with plastic wrap and refrigerate overnight, or for up to 4 days. The long, slow fermentation in the refrigerator develops a more complex flavor and improves the texture of the bread.
Step 7: Divide and Shape the Dough Remove the dough from the refrigerator. Divide it into 2 equal parts for 2 loaves. Divide each part into 5 equal pieces. Roll each piece into a rope about 10 inches long. Keeping the ropes uniform in length ensures an even braid.
Step 8: Braid the Chałka Pinch one end of the ropes together and start braiding. Number the ropes from 1 to 5 from left to right. Always cross rope 1 over 3, then rope 2 over 3, and finally rope 5 over 2. Repeat until the braid is complete, and pinch the ends together. This braiding technique creates the signature look of Chałka bread.
Step 9: Second Rise Transfer the braids onto a baking sheet lined with parchment paper. Brush with egg wash (1 beaten egg with 1 tablespoon of water) and let rise for 1 hour in a warm, draft-free place. Reserve the remaining egg wash for a second coating. The egg wash gives the bread a shiny, golden-brown crust.
Step 10: Final Rise and Topping Brush the loaves again with the remaining egg wash and optionally sprinkle with poppy and sesame seeds. Let rise for an additional 30 minutes to 1 hour, depending on the type of yeast used and the ambient temperature. The final rise allows the bread to become light and airy before baking.
Step 11: Bake the Chałka Preheat the oven to 350°F (175°C). Bake the loaves for 30-40 minutes until the tops and bottoms are lightly browned and the bread sounds hollow when tapped. If the tops are browning too quickly, tent them with foil.
Step 12: Cool and Enjoy Cool the baked Chałka completely on a wire rack before slicing and serving. This prevents the bread from becoming soggy.
COOKING Rating: Intermediate. While the steps are straightforward, braiding requires some patience and practice.
Serving Suggestions: Serve warm with butter or jam. Enjoy as part of a brunch spread or as a side to savory dishes. It makes exceptional French toast.
Tips:
- For a richer flavor, use high-quality butter.
- If the dough is too sticky while kneading, add flour one tablespoon at a time.
- Make sure your yeast is fresh for the best results.
- Don’t skip the overnight chilling; it significantly enhances the flavor.
- For a shiny crust, apply the egg wash generously.
Prep Time: 30 minutes (plus overnight chilling) Cook Time: 30-40 minutes Total Time: Approximately 15-16 hours (including chilling and rising times)
Nutritional Information: (Estimated, per slice) Calories: 250-300 Protein: 6-8 grams Sodium: 200-250 mg
Conclusion: Polish Chałka bread is more than just a recipe; it’s an experience. From the initial mixing to the final braid, each step is a testament to the love and care that goes into creating this beautiful and delicious bread. With its tender crumb, golden crust, and slightly sweet flavor, it’s perfect for any occasion, from family gatherings to quiet mornings. So, gather your ingredients, follow these steps, and prepare to enjoy the delightful results of your homemade Chałka bread. It’s a taste of tradition that you’ll want to share with everyone.
Questions and Answers about this recipe:
Q1: Can I use a different type of flour? A: While all-purpose flour works well for this recipe, you can substitute with bread flour for a chewier texture. Be aware that bread flour absorbs more liquid, so you might need to adjust the amount of water slightly.
Q2: What if I don’t have time for the overnight chill? A: The overnight chill is recommended for flavor development, but if you’re short on time, you can let the dough rise in a warm place for 2-3 hours until doubled in size. Keep in mind that the flavor won’t be as complex.
Q3: How do I store leftover Chałka bread? A: Wrap the bread tightly in plastic wrap or store it in an airtight container at room temperature for up to 3 days. For longer storage, you can freeze it for up to 2 months. Thaw completely before serving.
Q4: Can I add any other flavors or ingredients to the dough? A: Absolutely! Feel free to add lemon or orange zest, cardamom, or even a handful of raisins or chocolate chips to the dough for added flavor.
Q5: My braid keeps falling apart. What am I doing wrong? A: Make sure you pinch the ends of the ropes together firmly before braiding. Also, ensure that the dough isn’t too sticky. If it is, lightly dust your work surface with flour. Practice makes perfect, so don’t be discouraged if your first braid isn’t perfect.