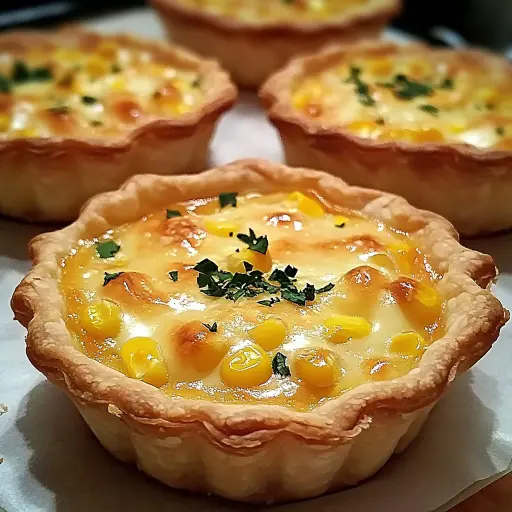
These delightful mini cheese and corn tarts are the perfect appetizer, snack, or addition to any brunch spread. Flaky, savory crusts cradle a creamy, cheesy filling bursting with sweet corn. These are incredibly easy to make and even easier to eat!
Ingredients:
For the Savory Shortcrust Pastry:
- 2 ½ cups (approx. 300g) All-Purpose Flour
- 1 teaspoon Salt
- 1 cup (226g) Unsalted Butter, cold and cubed
- ½ cup (120ml) Ice Water (you may need a tablespoon more or less)
For the Cheesy Corn Filling:
- 1 tablespoon Olive Oil
- 1 small Onion, finely chopped (approx. ½ cup)
- 2 cloves Garlic, minced
- 1 ½ cups (approx. 225g) Sweet Corn Kernels (fresh, frozen, or canned, drained)
- 4 oz (113g) Cream Cheese, softened
- 1 cup (approx. 100g) Sharp Cheddar Cheese, grated
- ½ cup (approx. 50g) Monterey Jack Cheese, grated
- ¼ cup (approx. 25g) Parmesan Cheese, grated
- 1 large Egg, lightly beaten
- 2 tablespoons Fresh Chives or Parsley, finely chopped
- ½ teaspoon Smoked Paprika (optional)
- ¼ teaspoon Black Pepper, freshly ground
- Salt to taste
Preparation:
Part 1: Preparing the Savory Shortcrust Pastry
Step 1: Combine Dry Ingredients: In a large mixing bowl, whisk together the all-purpose flour and salt. This ensures even distribution of the salt and prevents pockets of saltiness in the finished pastry.
Step 2: Cut in the Butter: Add the cold, cubed butter to the flour mixture. This is the most crucial step for creating flaky layers! The cold butter will create steam when baked, separating the layers of dough. Using a pastry blender, your fingertips (working quickly to prevent the butter from melting), or a food processor (on pulse mode), cut the butter into the flour until the mixture resembles coarse breadcrumbs with some pea-sized pieces of butter remaining. Don’t overmix!
Step 3: Add Ice Water: Gradually drizzle in the ice water, one tablespoon at a time, mixing lightly with a fork after each addition, just until the dough starts to come together. Be careful not to add too much water or overmix, as this can develop the gluten in the flour, resulting in a tough pastry. The goal is to hydrate the flour just enough to form a cohesive dough.
Step 4: Form and Chill Dough: Turn the dough out onto a lightly floured surface and gently bring it together into a ball. Divide the dough in half, flatten each half into a disc, wrap tightly in plastic wrap, and refrigerate for at least 1 hour (or up to 2 days). Chilling is essential for relaxing the gluten and firming up the butter. This makes the dough easier to roll and prevents it from shrinking during baking, resulting in a tender, flaky crust.
Part 2: Making the Cheesy Corn Filling
Step 1: Sauté Aromatics: Heat the olive oil in a medium skillet over medium heat. Add the finely chopped onion and sauté for 4-5 minutes until softened and translucent. Cooking the onion first mellows its flavor and prevents it from being too harsh in the finished tarts. Add the minced garlic and cook for another minute until fragrant, being careful not to burn it. Burnt garlic is bitter and will ruin the flavor of the filling.
Step 2: Cook Corn: Add the sweet corn kernels to the skillet. Cook for 5-7 minutes, stirring occasionally, until the corn is tender and slightly golden. If using frozen corn, ensure it’s thawed and patted dry to remove excess moisture. Excess moisture will make the filling soggy. If using canned, ensure it’s thoroughly drained. Cooking the corn slightly before adding it to the filling enhances its sweetness and prevents it from being too watery.
Step 3: Combine Cheeses and Egg: In a separate medium bowl, combine the softened cream cheese, grated sharp cheddar cheese, grated Monterey Jack cheese, and grated Parmesan cheese. Mix until well combined. Softened cream cheese blends easily and prevents lumps in the filling. Using a variety of cheeses adds depth and complexity to the flavor profile.
Step 4: Season and Mix Filling: Stir in the lightly beaten egg, chopped fresh chives (or parsley), smoked paprika (if using), black pepper, and salt to taste. The egg acts as a binder, holding the filling together. Fresh herbs add brightness and freshness. Smoked paprika adds a subtle smoky depth and lovely color. Remember, cheeses are salty, so taste before adding too much salt.
Step 5: Add Corn and Onion: Add the cooked corn and onion mixture to the cheese mixture. Stir well until everything is evenly incorporated. Set aside while you prepare the pastry shells. This ensures that the flavors meld together.
Part 3: Assembling and Baking the Tarts
Step 1: Preheat Oven & Prepare Muffin Tin: Preheat your oven to 375°F (190°C). Lightly grease a standard 12-cup muffin tin (or two, depending on the size of your tart circles, this recipe should yield about 20-24 mini tarts). Greasing the muffin tin prevents the tarts from sticking and makes them easier to remove.
Step 2: Roll Out Dough: On a lightly floured surface, take one disc of chilled dough (keep the other refrigerated to keep it cold). Roll it out to about ⅛-inch thickness. Rolling the dough too thin will result in a fragile crust, while rolling it too thick will result in a tough crust.
Step 3: Cut Pastry Circles: Using a round cookie cutter (approximately 3-4 inches in diameter, depending on your muffin tin size – it should be large enough to line the cup and come up the sides slightly), cut out circles from the dough. Re-roll scraps as needed, but try to handle the dough as little as possible. Overworking the dough will develop the gluten and make the crust tough.
Step 4: Line Muffin Cups: Gently press each pastry circle into a muffin cup, pressing it against the bottom and up the sides. Make sure the pastry comes up the sides slightly, as it will shrink during baking.
Step 5: Fill the Tarts: Spoon the cheese and corn filling evenly into each pastry-lined muffin cup. Don’t overfill the tarts, or the filling will overflow during baking.
Step 6: Bake: Bake for 20-25 minutes, or until the crust is golden brown and the filling is set and lightly golden on top. The baking time will vary depending on your oven. Keep an eye on the tarts and adjust the baking time accordingly.
Step 7: Cool & Serve: Let the tarts cool in the muffin tin for a few minutes before carefully removing them and transferring them to a wire rack to cool completely. Serve warm or at room temperature.
Why You’ll Love This Recipe:
- Easy to Make: The recipe is straightforward and uses readily available ingredients.
- Versatile: Perfect as an appetizer, snack, brunch item, or potluck contribution.
- Crowd-Pleasing: The combination of cheesy and sweet flavors is appealing to most palates.
- Customizable: Feel free to adjust the cheese blend, add different vegetables, or spice it up with a pinch of cayenne pepper.
- Freezable: Baked tarts can be frozen for later enjoyment.
Presentation Suggestions:
- Serve the mini tarts on a platter garnished with fresh herbs like parsley or chives.
- Arrange them in a pyramid for a visually appealing presentation.
- Accompany them with a dollop of sour cream or a sprinkle of red pepper flakes for added flavor and visual interest.
- Serve with a side salad for a light lunch or dinner.
Tips:
- Keep the Butter Cold: Cold butter is key to a flaky crust. If the butter gets too warm, the pastry will be tough.
- Don’t Overmix the Dough: Overmixing develops gluten, resulting in a tough crust. Mix only until the dough comes together.
- Chill the Dough: Chilling relaxes the gluten and firms up the butter, making the dough easier to roll and preventing it from shrinking during baking.
- Use a Variety of Cheeses: A blend of cheeses adds depth and complexity to the flavor of the filling.
- Don’t Overfill the Tarts: Overfilling can cause the filling to overflow during baking.
- Adjust the Seasoning: Taste the filling before baking and adjust the seasoning as needed.
Time Breakdown:
- Prep Time: 30 minutes
- Chill Time: 1 hour
- Cook Time: 25 minutes
- Total Time: 1 hour 55 minutes
Nutritional Information (per tart, approximate):
- Calories: 150-200
- Protein: 5-7g
- Sodium: 150-250mg
Conclusion:
These Mini Cheese and Corn Tarts are a guaranteed hit. With their flaky crust, creamy filling, and delightful combination of flavors, they are perfect for any occasion. So, gather your ingredients, follow the steps, and enjoy these little bites of happiness!
Q&A:
Q1: Can I use pre-made pie crust for this recipe?
A1: Yes, you can use pre-made pie crust to save time. However, keep in mind that the flavor and texture might not be quite as good as homemade. Look for a high-quality, all-butter pie crust for the best results. Be sure to thaw it according to the package instructions before using.
Q2: Can I make these tarts ahead of time?
A2: Absolutely! These tarts can be made ahead of time in several ways. You can prepare the pastry dough and keep it refrigerated for up to 2 days or frozen for up to 2 months. You can also assemble the tarts and keep them refrigerated (unbaked) for up to 24 hours before baking. For fully baked tarts, you can store them in the refrigerator for up to 3 days or freeze them for up to 2 months. Reheat them in a preheated oven at 350°F (175°C) until warmed through.
Q3: Can I substitute the Monterey Jack cheese with another cheese?
A3: Yes, Monterey Jack cheese can be substituted with other mild, melting cheeses like mozzarella, Gouda, or even provolone. These cheeses will provide a similar creamy texture and subtle flavor that complements the other cheeses and corn in the filling.
Q4: Can I add other vegetables to the filling?
A4: Definitely! Feel free to get creative with the filling and add other vegetables. Diced bell peppers, zucchini, or roasted red peppers would be excellent additions. Just be sure to sauté them along with the onions and garlic to soften them before adding them to the cheese mixture.
Q5: I don’t have smoked paprika. Is it essential?
A5: No, smoked paprika is optional. It adds a subtle smoky depth and lovely color to the filling, but the tarts will still be delicious without it. If you don’t have smoked paprika, you can omit it or substitute it with a pinch of regular paprika for a touch of color.