Description
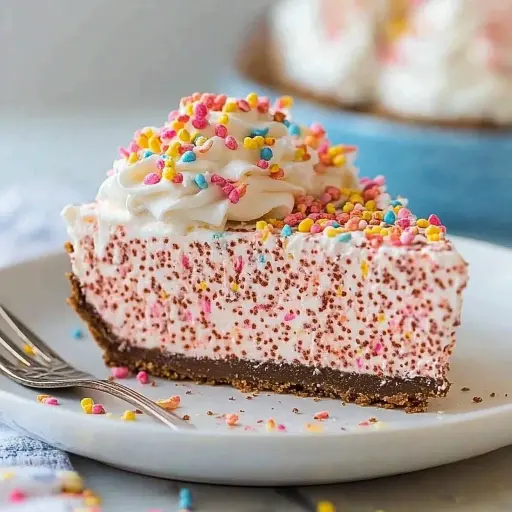
These No-Bake Fruity Pebble Dream Bars are a vibrant, whimsical dessert that requires absolutely no baking! Perfect for a hot summer day or when you need a quick and easy treat, these bars combine the nostalgic crunch of Fruity Pebbles cereal with a creamy, dreamy filling. With a buttery Nilla wafer crust and a generous topping of whipped cream and even more Fruity Pebbles, this dessert is a guaranteed crowd-pleaser for kids and adults alike. Get ready for a burst of color and flavor in every bite!
Ingredients:
- For the Crust:
- 1 cup Nilla Wafer crumbs (about 30 wafers)
- 2 cups Fruity Pebbles cereal
- ½ cup (1 stick) unsalted butter, melted
- For the Fruity Filling:
- 2 cups Fruity Pebbles cereal
- 1½ cups plus 2 tablespoons heavy cream, cold
- ¾ cup powdered sugar, divided
- 16 ounces (2 packages) cream cheese, softened
- ½ cup granulated sugar
- For the Topping:
- ¾ cup heavy cream, cold
- ½ cup Fruity Pebbles cereal
- 2 tablespoons powdered sugar
Preparation:
Before you start: ensure your cream cheese is fully softened (leave it out at room temperature for at least an hour), and your heavy cream is well-chilled. This will help achieve the best textures for the filling and topping.
Instructions:
- Step 1: Prepare the Crust
- Place Nilla Wafers and 2 cups of Fruity Pebbles into a food processor. Pulse until you have fine crumbs. You can also crush them in a large zip-top bag using a rolling pin if you don’t have a food processor.
- In a medium bowl, combine the Nilla Wafer/Fruity Pebbles crumbs with the melted butter. Mix well until the crumbs are evenly moistened.
- Press the crumb mixture firmly into the bottom of a 9-inch springform pan. Use the bottom of a measuring cup or your fingers to create a compact, even layer. Place the pan in the refrigerator while you prepare the filling.
- Step 2: Crush the Filling Pebbles
- Place 2 cups of Fruity Pebbles into the food processor (no need to wash it after the crust!). Pulse until the cereal is coarsely crushed. Set aside.
- Step 3: Make the Whipped Cream Base
- In a large bowl, or the bowl of a stand mixer fitted with the whisk attachment, combine 1½ cups plus 2 tablespoons of heavy cream and ¼ cup of the powdered sugar. Beat on medium-high speed until stiff peaks form. Be careful not to overwhip! Transfer the whipped cream to a separate bowl and set aside.
- Step 4: Prepare the Cream Cheese Filling
- In the same large bowl (or the bowl of your stand mixer, no need to wash!), beat the softened cream cheese and granulated sugar together until smooth and creamy. Make sure there are no lumps.
- Gently fold in the whipped cream into the cream cheese mixture until just combined. Be careful not to deflate the whipped cream.
- Fold in the crushed Fruity Pebbles cereal. Distribute the cereal evenly throughout the cream cheese mixture.
- Step 5: Assemble and Chill
- Pour the cream cheese filling over the prepared crust in the springform pan. Spread evenly.
- Cover the pan with plastic wrap and refrigerate for a minimum of 4 hours, or preferably overnight, to allow the filling to set completely.
- Step 6: Prepare the Topping
- Just before serving, prepare the final whipped cream topping. In a clean bowl, combine the remaining ¾ cup of heavy cream and 2 tablespoons of powdered sugar. Beat on medium-high speed until stiff peaks form.
- Step 7: Decorate and Serve
- Remove the springform pan sides. Spread the whipped cream evenly over the top of the chilled filling.
- Sprinkle the remaining ½ cup of Fruity Pebbles over the whipped cream. For an extra touch, dust the top with the remaining 2 tablespoons of powdered sugar.
- Slice and serve immediately.
Why You’ll Love This Recipe
- No-Bake Convenience: Perfect for when you want a delicious dessert without turning on the oven.
- Fun and Colorful: The vibrant Fruity Pebbles make this dessert visually appealing and exciting.
- Easy to Customize: You can easily adapt this recipe with different cereals, extracts, or flavors.
- Kid-Friendly: This dessert is a hit with children, making it perfect for parties and family gatherings.
- Make-Ahead Friendly: The filling can be made a day in advance and stored in the refrigerator, saving you time on the day of serving.
Serving Suggestions:
- Presentation is Key: Use a sharp knife to cut neat slices for a professional look.
- Add Fresh Fruit: Garnish with fresh berries, such as strawberries or blueberries, for added flavor and visual appeal.
- Drizzle with Chocolate: A drizzle of melted white or milk chocolate can add an extra layer of decadence.
- Individual Portions: Serve in small mason jars or dessert cups for individual portions.
Tips:
- Don’t Overmix: When folding in the whipped cream, be gentle to avoid deflating it. This will help keep the filling light and airy.
- Chill Time is Crucial: Make sure to allow the filling to set completely in the refrigerator for at least 4 hours, or preferably overnight. This will prevent it from being too soft.
- Keep it Cold: Store leftovers in the refrigerator to maintain the texture and prevent the whipped cream from melting.
- Variations: Experiment with different cereals or extracts to create your own unique flavor combinations.
Prep Time: 20 minutes Chill Time: 4 hours (minimum, preferably overnight) Total Time: 4 hours 20 minutes
Nutritional Information (Per Serving):
- Calories: Approximately 450-550 (This will vary based on specific ingredient brands and portion sizes)
- Protein: 5-7g
- Sodium: 150-200mg
(Note: This nutritional information is an estimate and should not be used as definitive health advice. Please consult a nutritionist or use a nutritional calculator for more accurate information.)
Conclusion
These No-Bake Fruity Pebble Dream Bars are a fun, easy, and delicious dessert that’s sure to bring a smile to everyone’s face. Whether you’re looking for a quick treat for a summer party or a colorful dessert for a special occasion, this recipe is a winner. The combination of crunchy cereal, creamy filling, and fluffy whipped cream is simply irresistible. Enjoy!
Q&A:
- Can I use a different type of cereal for this recipe?
- Absolutely! While Fruity Pebbles provides a vibrant color and flavor, you can substitute it with other cereals like Rice Krispies, Cocoa Pebbles, or even crushed cookies for a different twist. Just be mindful that the flavor profile will change accordingly.
- Can I make this recipe ahead of time?
- Yes, this recipe is perfect for making ahead of time! The crust and filling can be prepared a day in advance. Just make sure to cover the pan tightly with plastic wrap and refrigerate until ready to assemble. Add the whipped cream topping just before serving to prevent it from getting soggy.
- Can I freeze this dessert?
- While it’s best enjoyed fresh, you can freeze these bars for up to a month. However, be aware that the texture of the whipped cream may change slightly after thawing. To freeze, cut the bars into individual portions, wrap them tightly in plastic wrap, and then place them in a freezer-safe container. Thaw in the refrigerator before serving.
- What if I don’t have a springform pan?
- If you don’t have a springform pan, you can use a regular pie dish or a square baking pan lined with parchment paper. The parchment paper will make it easier to lift the bars out once they’ve set. Keep in mind that it may be a bit more challenging to get neat slices without the removable sides of a springform pan.
- Can I reduce the amount of sugar in this recipe?
- Yes, you can reduce the amount of sugar slightly, but keep in mind that it will affect the overall sweetness and texture of the dessert. Start by reducing the granulated sugar in the cream cheese filling by ¼ cup and the powdered sugar in the whipped cream by 1 tablespoon. Taste as you go and adjust to your preference. You can also use sugar substitutes, but be aware that they may alter the flavor and texture.