Description
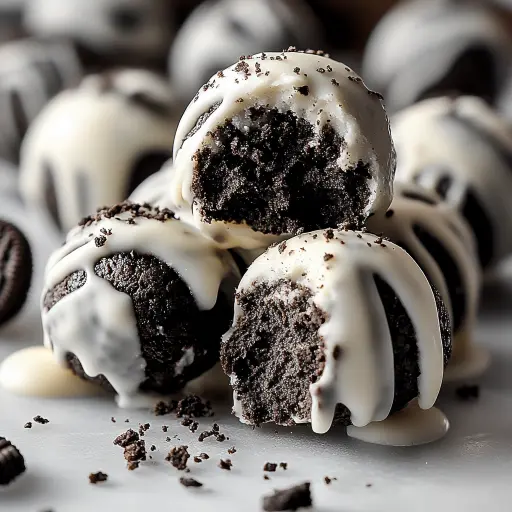
These Oreo Balls are a simple, no-bake treat that’s perfect for parties, holidays, or anytime you crave a sweet indulgence. This recipe uses sweetened condensed milk instead of cream cheese, creating a slightly different texture that’s equally delicious. They are easy to make and only require a few ingredients, making them a crowd-pleasing dessert that everyone will love!
Ingredients
- 2 cups crushed Oreo cookies (about 18–20 cookies)
- ½ cup sweetened condensed milk
- 1 cup semi-sweet chocolate chips (or any chocolate you prefer)
- 1 tablespoon vegetable oil (optional, for a smoother chocolate coating)
Preparation
Step 1: Crush the Oreos: The first step is to crush the Oreo cookies. You can use a food processor for this, pulsing until the cookies are finely crushed. If you don’t have a food processor, no problem! Place the cookies in a sealed plastic bag and use a rolling pin to crush them into fine crumbs. The finer the crumbs, the better the Oreo balls will hold together.
Step 2: Mix with Sweetened Condensed Milk: In a medium bowl, combine the crushed Oreos with the sweetened condensed milk. Mix well until thoroughly combined. You should form a sort of dough. This might take a little elbow grease, but keep mixing until everything is evenly distributed and the mixture starts to clump together.
Step 3: Form the Balls: Now comes the fun part! Scoop out tablespoon-sized portions of the Oreo mixture. Roll each portion between your palms to form smooth, even balls. Place the formed balls on a baking sheet lined with parchment paper. Parchment paper is essential here to prevent the balls from sticking.
Step 4: Chill: Place the baking sheet with the Oreo balls into the refrigerator. Chill for at least 30 minutes, or until the balls are firm. Chilling helps the balls hold their shape and makes them easier to dip in chocolate.
Step 5: Melt the Chocolate: While the Oreo balls are chilling, melt the chocolate. In a microwave-safe bowl, combine the chocolate chips and vegetable oil (if using). Microwave in 30-second intervals, stirring after each interval, until the chocolate is completely melted and smooth. The vegetable oil helps to create a smoother, more dippable chocolate.
Step 6: Coat the Oreo Balls: Remove the chilled Oreo balls from the refrigerator. Using a fork or a dipping tool, dip each ball into the melted chocolate, ensuring it’s fully coated. Lift the ball out of the chocolate and allow any excess chocolate to drip off. Gently tap the fork or dipping tool against the side of the bowl to help remove excess chocolate.
Step 7: Let Set: Place the chocolate-coated Oreo balls back onto the parchment-lined baking sheet. Return the baking sheet to the refrigerator for another 15-20 minutes, or until the chocolate is completely set and firm.
Step 8: Serve: Once the chocolate has set, the Oreo balls are ready to serve! Enjoy these delicious treats as a sweet snack or dessert. Store any leftovers in an airtight container in the refrigerator to maintain their freshness.
Why You’ll Love This Recipe
- No-Bake: This recipe requires no baking, making it perfect for hot days or when you want a quick and easy dessert.
- Simple Ingredients: You only need a few basic ingredients that you probably already have in your pantry.
- Customizable: You can easily customize this recipe by using different types of chocolate, adding sprinkles, or incorporating other flavors.
- Crowd-Pleasing: Oreo balls are always a hit at parties and gatherings, and this recipe is sure to be a crowd-pleaser.
- Fun to Make: This recipe is simple enough that even kids can help with the preparation, making it a fun activity for the whole family.
Serving Suggestions
- Presentation: Arrange the Oreo balls on a decorative platter or in a gift box for a polished presentation.
- Garnish: Sprinkle the chocolate-coated Oreo balls with crushed Oreos, sprinkles, or a drizzle of white chocolate for added visual appeal.
- Pairing: Serve the Oreo balls with a glass of cold milk, a scoop of vanilla ice cream, or a cup of hot coffee for a delightful combination.
- Occasions: Perfect for holiday parties, birthday celebrations, potlucks, or as a homemade gift.
Tips
- Chocolate Choice: Experiment with different types of chocolate, such as milk chocolate, dark chocolate, or white chocolate, to find your favorite combination. You can even use a combination of chocolates for a more complex flavor profile.
- Crushing Oreos: For the best texture, make sure the Oreo crumbs are as fine as possible. A food processor works best, but a rolling pin and a plastic bag can also do the trick.
- Sweetened Condensed Milk: Use the recommended amount of sweetened condensed milk to achieve the right consistency. Too much can make the mixture too sticky, while too little can make it too dry.
- Chilling Time: Don’t skip the chilling time. Chilling the Oreo balls helps them hold their shape and makes them easier to dip in chocolate.
- Smooth Chocolate Coating: Adding a tablespoon of vegetable oil to the melted chocolate will make it smoother and easier to coat the Oreo balls. You can also use coconut oil for a slightly different flavor.
- Even Coating: Use a fork or dipping tool to ensure an even chocolate coating. Gently tap off any excess chocolate to prevent a thick, uneven layer.
- Storage: Store the Oreo balls in an airtight container in the refrigerator to maintain their freshness and prevent the chocolate from melting. They can be stored for up to a week.
Prep Time: 15 minutes Chill Time: 45 minutes Total Time: 1 hour
Nutritional Information (per Oreo ball): Please note that these are rough estimates, and actual values may vary based on specific ingredients and serving sizes.
- Calories: 80-100
- Protein: 1 gram
- Sodium: 20-30 mg
Conclusion
These No Cream Cheese Oreo Balls are a delightful, easy-to-make treat that is perfect for any occasion. Their simple ingredients and no-bake nature make them a go-to dessert when you need something quick and delicious. Whether you’re making them for a party, a holiday, or just a sweet craving, these Oreo Balls are sure to be a hit. Enjoy!
Q&A About This Recipe:
Q1: Can I use a different type of cookie instead of Oreos?
A: Absolutely! While the recipe is specifically for Oreo Balls, you can definitely experiment with other types of cookies. Chocolate chip cookies, peanut butter cookies, or even vanilla wafers would all work well. Just keep in mind that the texture and flavor will be different, so adjust the amount of sweetened condensed milk as needed to achieve the right consistency.
Q2: What if I don’t have sweetened condensed milk? Can I use something else?
A: Sweetened condensed milk is crucial for this recipe to achieve the right texture and sweetness without cream cheese. Substituting it with regular milk or cream won’t give you the same results. If you’re really in a pinch, you might be able to use a very thick homemade caramel sauce, but sweetened condensed milk is the recommended ingredient.
Q3: The chocolate is seizing up when I try to melt it. What am I doing wrong?
A: Chocolate can seize up if it comes into contact with even a tiny bit of moisture. Make sure your bowl and utensils are completely dry before melting the chocolate. Melting the chocolate in short intervals (30 seconds) and stirring after each interval will also help prevent it from overheating and seizing. If the chocolate does seize up, try stirring in a teaspoon of vegetable oil or shortening to help smooth it out.
Q4: Can I freeze these Oreo Balls?
A: Yes, you can freeze these Oreo Balls for longer storage. Place the fully coated and set Oreo Balls in a single layer on a baking sheet lined with parchment paper and freeze for about 2 hours. Once frozen, transfer them to an airtight container or freezer bag. They can be stored in the freezer for up to 2-3 months. Thaw them in the refrigerator for a few hours before serving.
Q5: What can I use instead of vegetable oil to make the chocolate smoother?
A: If you don’t want to use vegetable oil, you can use coconut oil, shortening, or even a small amount of butter. Coconut oil will add a subtle coconut flavor to the chocolate, while shortening is flavorless. Butter will add a richness to the chocolate, but be careful not to use too much, as it can make the chocolate too thin.