Why you will love this recipe
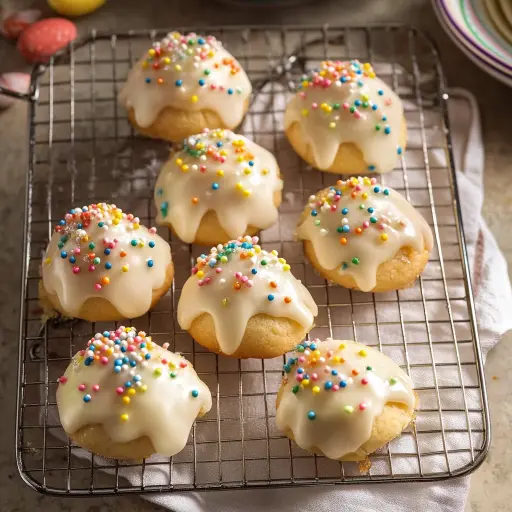
These Italian Easter Cookies, also known as Uncinetti, are a delightful and traditional treat perfect for celebrating the spring season. What makes them so irresistible? Their subtly sweet flavor, the bright aroma of lemon zest, and the adorable knot shape make them a festive and charming addition to any Easter gathering. The light and airy texture, achieved through gentle baking, ensures they practically melt in your mouth. Plus, the customizable glaze – whether you opt for a tangy lemon glaze or a simple dusting of powdered sugar – allows you to tailor the sweetness to your preference. These cookies are incredibly easy to make, requiring minimal ingredients and straightforward instructions. They are also a fantastic make-ahead option, as they store well for several days, making them perfect for busy holiday preparations. Beyond their delicious taste and ease of preparation, these cookies carry a sense of tradition and warmth, evoking memories of family gatherings and passed-down recipes. They are not just cookies; they are a taste of heritage and a symbol of celebration.
Ingredients:
ITALIAN EASTER COOKIES
1½ cups + 2 tablespoons all-purpose flour (200 grams total)
3 ¼ tablespoons granulated sugar
1 teaspoon baking powder
1 pinch salt*
Zest of one lemon
1 large egg
¼ cup butter (melted and cooled)
4 tablespoons milk (I use 2%)
*If you use unsalted butter then add 1/4 teaspoon of salt.
LEMON GLAZE
1 ½ -2 cups powdered / icing sugar
1 tablespoon lemon juice (approximately)
1 tablespoon milk (approximately)
Preparation:
Step 1: Prepare the Oven and Baking Sheet
Preheat your oven to 300°F (150°C). This lower temperature is crucial for achieving the desired tender and slightly chewy texture of the cookies. Line a large cookie sheet with parchment paper. Parchment paper prevents the cookies from sticking, ensuring easy removal and cleanup. It also helps to distribute heat evenly, preventing the bottoms of the cookies from browning too quickly.
Step 2: Combine Dry Ingredients
In a large mixing bowl, whisk together the all-purpose flour, granulated sugar, baking powder, salt, and lemon zest. Whisking ensures that the ingredients are evenly distributed, preventing clumps of baking powder and ensuring consistent leavening throughout the cookies. The lemon zest adds a bright, aromatic flavor that complements the sweetness of the cookies. For the best flavor, use freshly grated lemon zest rather than dried.
Step 3: Incorporate Wet Ingredients
Create a well in the center of the dry ingredients. Add the egg, melted and cooled butter, and milk to the well. The melted and cooled butter adds richness and moisture to the cookies, while the milk helps to bind the ingredients together. Ensure the butter is cooled to prevent it from cooking the egg.
Step 4: Form the Dough
Using a fork, gently combine the wet ingredients with the dry ingredients until the mixture is almost combined. Then, transfer the mixture to a lightly floured flat surface. Gently knead the dough until it forms a smooth, pliable ball. Be careful not to over-knead the dough, as this can develop the gluten and result in tough cookies. The dough should be slightly tacky but not sticky.
Step 5: Shape the Cookies
Pinch off small pieces of dough, approximately 1-2 tablespoons each. Roll each piece of dough into a rope about 5-6 inches (13-16 cm) long and ¼ inch thick. The thinner the ropes, the more delicate the cookies will be. Form each rope into a knot shape. You can also create circles by joining the ends of the ropes together. Get creative with the shapes! The knot shape is traditional, but you can experiment with other festive designs.
Step 6: Bake the Cookies
Place the shaped cookies onto the prepared cookie sheet, leaving about ½ inch of space between each cookie. Bake for approximately 15-18 minutes, or until the edges are lightly golden. The baking time may vary depending on your oven, so keep a close eye on the cookies. They should be soft and slightly puffy when done.
Step 7: Cool the Cookies
Remove the cookie sheet from the oven and let the cookies cool on the sheet for a few minutes before transferring them to a wire rack to cool completely. Cooling the cookies on a wire rack prevents them from becoming soggy.
Step 8: Prepare the Lemon Glaze (Optional)
While the cookies are cooling, prepare the lemon glaze. In a small bowl, sift the powdered sugar to remove any lumps. Add the lemon juice and milk, starting with 1 tablespoon of each. Whisk until the glaze is smooth and reaches your desired consistency. Add more lemon juice or milk, 1 teaspoon at a time, until you achieve the perfect glaze. The glaze should be thick enough to coat the cookies but thin enough to drizzle easily.
Step 9: Glaze or Dust the Cookies
Once the cookies are completely cool, you can glaze them with the lemon glaze or dust them with powdered sugar. To glaze the cookies, dip each cookie into the glaze, allowing the excess to drip off. Place the glazed cookies back on the wire rack to allow the glaze to set. To dust the cookies with powdered sugar, simply sprinkle powdered sugar over the top of each cookie.
Serving Suggestions:
Serve these Italian Easter Cookies as a delightful dessert after Easter dinner or as a sweet treat with afternoon tea or coffee. They are also a wonderful addition to Easter baskets and make a thoughtful homemade gift for friends and family. Pair them with a glass of sweet wine or a cup of herbal tea for a perfect springtime indulgence.
Tips:
For a richer flavor, use brown butter instead of melted butter. To make brown butter, melt the butter in a saucepan over medium heat, stirring constantly, until it turns a golden brown color and emits a nutty aroma. Let the brown butter cool completely before using it in the recipe.
If you don’t have lemon zest, you can substitute it with orange zest or a pinch of ground cardamom.
To prevent the cookies from spreading too much during baking, chill the dough for 30 minutes before shaping the cookies.
For a more pronounced lemon flavor, add a few drops of lemon extract to the dough.
Store the cookies in an airtight container at room temperature for up to one week.
Prep Time: 20 minutes
Cook Time: 15-18 minutes
Total Time: 35-40 minutes
Nutritional Information:
(Per cookie, approximate):
Calories: 80-100
Protein: 1g
Sodium: 10-20mg
(Note: Nutritional information will vary based on specific ingredients and serving size.)
Conclusion
These Italian Easter Cookies / Uncinetti are a delightful and easy-to-make treat that will bring a touch of Italian tradition to your Easter celebration. With their delicate flavor, charming knot shape, and customizable glaze, they are sure to be a hit with family and friends. Whether you are an experienced baker or a novice in the kitchen, this recipe is simple enough for anyone to master. So gather your ingredients, preheat your oven, and get ready to create a batch of these irresistible cookies that will add a touch of sweetness to your holiday festivities. Buon appetito!
Frequently Asked Questions:
Q1: Can I use gluten-free flour in this recipe?
A1: Yes, you can substitute the all-purpose flour with a gluten-free all-purpose flour blend. However, keep in mind that gluten-free flours can sometimes result in a slightly different texture. You may need to add a binder like xanthan gum to help hold the cookies together. Start with about 1/2 teaspoon of xanthan gum per cup of gluten-free flour.
Q2: What can I use if I don’t have lemon zest?
A2: If you don’t have lemon zest, you can substitute it with orange zest for a similar citrusy flavor. Alternatively, you can add a pinch of ground cardamom or a few drops of lemon extract to the dough for a hint of flavor.
Q3: My cookies are spreading too much during baking. What can I do?
A3: There are a few reasons why your cookies might be spreading too much. First, make sure you are using the correct oven temperature. Baking at a lower temperature (300°F / 150°C) helps to prevent spreading. Second, chill the dough for 30 minutes before shaping the cookies. This will help to firm up the butter and prevent the cookies from spreading. Finally, make sure your baking sheet is not greased, as this can also cause the cookies to spread. Using parchment paper is the best option.
Q4: Can I freeze the dough for later use?
A4: Yes, you can freeze the dough for later use. Wrap the dough tightly in plastic wrap and then place it in an airtight freezer bag or container. The dough can be frozen for up to three months. When you are ready to bake the cookies, thaw the dough in the refrigerator overnight and then proceed with the recipe as directed.
Q5: How do I prevent the cookies from becoming too hard?
A5: To prevent the cookies from becoming too hard, avoid overbaking them. The cookies should be soft and slightly puffy when done. Also, make sure to store the cookies in an airtight container at room temperature. If the cookies do become a little hard, you can soften them by placing a slice of bread in the container with the cookies for a day or two. The bread will release moisture and help to soften the cookies.